Showing posts with label Mill Farm patterns. Show all posts

Wednesday, December 23, 2015

Single fabric challenge - Shear Madness - Lisa


Bluebird

When Laura announced a single fabric challenge on the      Shear Madness FB page, I was all in.  The fabric is cotton   with a floral/vine print and lots of birds.  All in shades of blue and white.  By 'single fabric' the costume is supposed to be made with the chosen fabric as the focus.  I came back from Costume College with a strong desire to make a jacket/curacao/casaquin targeting the 1780's (which I'm not sure I did, it might be earlier).  I'm not terribly worried about historical accuracy and the fabric 'reads' 18C but clearly is not.  In addition, during our spring trip to Morocco, I suffered a little anxiety on a camel that enjoyed his liberty a little too much.  We took to yelling 'liberte' every time he pulled loose from the line, with me on his back.  Happily, he never took off across the desert.  So for me it's all  about French Revolution and freedom seeking camels from a (previously) French speaking country, and birds.  I'm a part time birder.

See the faded birds in the center...print matching the bodice


Everything but the stays had to be made.  The jacket is the focus, and is made from the challenge fabric, plus a little of the solid blue left over from my Neried skirt.


aww, look...they're kissing!
Jacket.  I started with the Mill Farm pattern that I used for Queen of Clubs.  I made a muslin and started drawing lines where I thought the zone front should go.  The I cut along the lines.  Thing is, this pattern is designed with a stomacher and I wanted to make it meet in the middle so this was a little more complicated than I expected.  I might have yelled 'I don't know what I'm doing' on a variety of occasions, and it took me longer than I expected.  I didn't have enough fabric to make mistakes.  The print is VERY directional and I wanted the birds to be facing each other front and back. Each piece was cut individually. I was worried about doing the Anglais pleating in the back because I didn't have Robin to help, but it wasn't that bad.  Steaming as I went really helped set the curved folds. I stitched them in place with a running stitch.  I left the center back piece long as a sort of 'swallowtail'.   Fitting the side back was the hardest part because I was in stays, and I'd put the sleeves in backwards.  I really, really didn't want to fix that, you know, when you're tired of looking at the same thing and are ready to be DONE.  But I did.  
                                           
Finally, I decided to add a faux belt in front because I like the look of the dress at left.  I even made my red ribbon striped by sewing some thin white ribbon over it.  

 
And I left a little gap where the print meets the blue at the center front so I could pull my fichu through.  Which I then forgot to do in all the pictures


pull fichu through here, unless you forget
finished skirt and shoes


Petticoat and petticoat - because we have to call them the same thing?  Both were made using tutorials from The Fashionable Past (Koshka)  The under petticoat was made from old sheets and really should be remade since it's too limp.  The skirt is white cotton voile with a big ruffle.  I don't have any construction photos available.  Oops.  I also made a rump pad.  It's a largish stuffed rectangle that ties around my waist.  I may remake that too since I'm not super happy with the shape.  Or not, because I'm not sure how often I will need it.

Kerchief/fichu- based on 10 minutes of research, typically 36 in square.  Quick math gives a hypotenuse of 51 inches.  Just about perfect unless you're rather tall with a large chest.  Quick estimate with a measuring tape yields 55 inches, plus seam allowance = 56.  Reverse the math, 39 1/2 inches on each side.  I used some beautiful sheer cotton voile and hand hemmed it.  Hand hems are much softer and more fluid than a machine seam.  Also much, much slower.  Now that I have this, I will be less concerned about my necklines.  I can make them lower and not worry about massive cleavage since I can cover it up.


The hat.  It's made 
from an ugly party sombrero that I deconstructed and sewed back together in the shape I wanted.  Then I spray painted it blue.


I made the birdcage from some wired burlap stuff on sale at Michael's.  I cut it, shaped it and set it with white glue. I cut out a square for the cage door, and used scraps to MAKE a cage door which I tacked on. Then I spray painted it gold.

The bird was the challenge.  I wanted a bluebird, that was flying free from the cage.  And I assumed that one could simply buy a bluebird with outstretched wings.  But NOOO.
So I got a wingless bluebird and a made wings.  

 Here is the sad little wingless bird with the wings in progress.  I made craft foam wing shapes and glued a wire on the leading edge so I could shape them a little.  Then I used a variety of blue, or blueish feathers and started gluing them down.  I tried to use white glue because it's not as heavy as hot glue.  I gave up pretty quickly.
 Gluing feathers was...interesting?  My kitten succeeded in running off with one of the wings but I caught him before too much damage was done.  Once everything was glued, I trimmed them into wing shapes.
Finally, I glued them to the sides of the bird. They only fell off twice.  And I'm only a little bit bothered that they aren't anything like actual bird wings....

I'm actually really happy with my bird.  I got it done, attached it to the cage and the beak fell off.  Oh happy, happy glue.


The final parts of the hat are the banner and the cockade.

The banner is blue grosgrain with wire sewn in.  I painted 'Liberte' on both sides and added gentle folds to make it 'float'.  This is the shout out to my charming Moroccan camel.


The cockade was a last minute addition.  I needed something to echo the red in the belt and I had taken a class in the spring on making cockades.  (A class from Candice Kling who is the most amazing ribbon worker, bar none)  This red cockade was one of my trials from the class.


And, finally, after a bit more glue and wire, some ruffles and ribbon, I got it done.  I tilted the cage because I will tilt the hat when I wear it.


Here is the final dress.  Pictures taken at sunset with horrid light, by a man who cannot figure how to work my camera.  I needed to wait for the rain to stop, and for my hair to dry so timing was awful.  and I made him take a lot of pictures and almost none of them are actually, totally in focus.  And my secret and very fun shoes don't show (just a little in the skirt picture).  They're red and white stripe Moroccan mules made from camel leather.   


Thursday, August 27, 2015

Demode Court Dress - SHINY and all in one place FINAL UPDATE - L


New pictures added below.
 Queen of Clubs.  All hope is not lost.  I've made a lot of progress in the last few days and have decided to re-assemble most of my posts in one place.

The Demode Court Dress for CoCo meet-up was delayed by one year.  This was a very good thing for me.  I had originally thought I could drape this without a pattern.  I now know this was wrong.  Maybe another time.  This is my first attempt at anything earlier than 1850 and I went right for something remarkably difficult.  Not only that, though, I chose an inspiration dress that is a victorian fancy dress.  I'm on my own to figure out how to make all the trim look 1770's.  Or even something sorta kinda like that.

 Last year I made stays and giant pocket hoops.  I also made a chemise.

Earlier this year I caved in and got a pattern.  Mill Farm.  I got it because it was cheap and I knew that I'd have to do a lot of modifications.  While the shape of the pattern is accurate, I find it confusing.  More confusing than it needs to be, mostly because there are no pictures or drawing in the instructions.

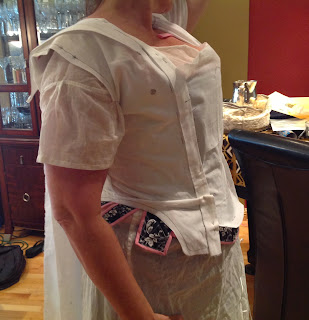
Step one.  FBA.  I couldn't find any help online for increasing bust volume for this kind of dress, so I made it up.  It actually worked pretty well.  Robin helped me fit and there were only modest changes.  But I was laced too tight.  When I checked the second muslin it was too small.

I 'fixed' it again and went ahead and cut.


I also cut organdy for an under petticoat.  I used Kendra's post for help in getting it put together because I really had NO IDEA.  None.  Pretty sloppy the first time through but it worked and won't show at all.  I promise to do better with the proper petticoat.  Really.  I have a picture but is is trapped in a device with a broken power cord.

So I have cut my cheap poly taffeta for bodice, petticoat, sleeves and skirt (including the pleated francaise back).  I chose cheap fabric because I wasn't sure I could do justice to a project this size and I just couldn't spend a ton of money on an abject failure (remembering the disastrous Edwardian tea dress here - no link for the obvious reason).

I managed to put everything on - pinned together and fraying - just to make sure that it did, in fact, actually fit.  Here is what I learned:

- Wow!  It is really shiny!
- The bodice fits pretty darned good (there is a pin in the center back because it was a little big)
and the creases mostly go away when I turn up the edge of the bodice.
- The length of the petticoat is fine.  I can do a little hem.  I can now sew it up for reals including that 'doing a better job' part.
- Wow, it is REALLY shiny!


Next, I need to start deciding what I want to do about the decoration.  Because it is time to start decorating the stomacher and front of the petticoat.  I have to wait for Robin to get back from travels to fit the sleeves and the pleated back.  I'm just not THAT flexible.  Not in stays.  My dress form is useless for this because it is nothing like my body.  It is smaller than my measurements but the shoulders and back are larger than me.  An expensive hanger.  But very helpful for deciding what trim combinations I like.  So there's that.

Fun fact - if I wear rubber soled shoes and drag my feet on the carpet, I could probably electrocute someone in this thing.  More to come soon.

Or not so soon.  And since I wrote the words above, I've learned even more.  Most everything needs to be hand sewn. It's just too fussy to do on a machine and would actually take MORE time.  Getting the dress to hand correctly over the hoops is difficult.  I would pin it on the dress form, baste it and hang it right side out.  And it would be uneven.  The pattern was not designed to be worn over panniers so I was on my own to figure it all out.  Attaching the skirt to the bodice with the pannier sides sticking out didn't work as simply as I expected and I just kept pinning basting and ripping out.  Eventually it was 'good enough' and I sewed it into place.  One area of dismay was sort of hidden by the watteau pleats and another was in plain view but my sleeves were often in the way.  The sleeves weren't as difficult as I'd expected.  Only had to baste them in twice.  For the record, at this point I was fully sick of looking at shiny ivory fabric and had started to pin trim on the dress.

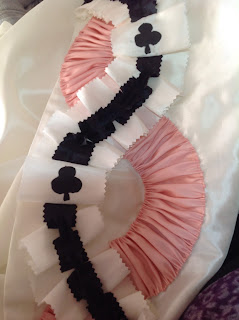
First was trim on the petticoat (AKA the underskirt).  My original color scheme and ideas had all flown the coop so I decided to put a large black band along the front and trim with ivory ruffles top and bottom.  And I also added 3 big quilted ivory clubs between the rows of ruffles. I made the clubs by cutting the very ravel-y fabric with a soldering iron.  I blanket stitched two layers of fabric around a layer of batting and then blanket stitched them to the front of the petticoat.


The sleeves flounces were attached before I sewed them to the bodice.  Much easier that way.  I wanted the trim at the base of the sleeve to be like the trim on the bodice.  I tried about 5 iterations of black and ivory before I hit on the one I liked best.  I had bought some 2 1/2 inch ribbon from the same fabric (in 3 colors) so i used that for most of the trim.  I zigzagged some of the black fabric for a added contrast over the ivory.  All the bodice trim was box pleated.


And I also experimented with crocheting little clubs and tacking them to the flounces.  It was a great way to channel the original dress, although a gigantic pain because I had to make 36 of them.

For the stomacher, I wanted some color.  The Queen of Clubs was originally the only Queen which held a flower.  And the flower was often a thistle.  I picked some ashy pink ribbon with green accents and made flower that looked like thistles and then I tacked them onto the stomacher.  For much of this hand sewing I had an assist from our new kitten, Eggroll.  He's adorable and cuddly and proceeded to knock over a large birdhouse and break his own leg (not badly).  This is just a part of the reason the poor blog has been neglected.

I also sewed the stomacher to one side of the bodice and used hooks and thread loops to close the other.  super easy cheat!


Last, and definitely not least, I added trim down the front of the skirts.  I wanted to try painting fabric and had a clever idea to paint clubs on part of this trim.  Problem was, I had to pin all the trim to determine where the clubs needed to go, and I needed to make a stamp because free-hand painting was a non-starter, AND I needed to check my paints to see which worked best.  First I made a stamp out of thick craft foam backed with poster board and glued to a lipstick cover.  This allowed me to get the most pressure without wiggling the stamp (and was also conveniently to hand).  Then I did a test with the 3 paints I had available.  Not all of them were stable after they dried.

While the paint was drying I started pinning trim.  I'd like to suggest I just whipped right thru it, but I didn't.  All the pink ribbon had to be gathered down each long edge and ruches.  All the ivory and black trim needed to be box pleated as I pinned so I could figure out where the painted clubs would be.  And then I would just get sick of it and have to walk away.

Once it was pinned in place I could jam some paper towels behind the fabric and stamp the clubs.  I only screwed one of them up!  Yay me!

 I was happy with how it turned out but felt it needed some green in the bottom part of the trim (to go with the top).  At this point, Costume College was a couple of days away and I hadn't started packing so I made some more leaves and tacked them in.  No pictures were taken.  I also decided to literally scrap together a mask from craft foam, spray paint on stick on jewels.


For the gala, I finally got to try it all on.

The wig turned out great, makeup was subtle (not bad for a first time through), and Robin took a picture that utterly disguised my wrinkles.  Thank you Rob!

Also, a picture of how easy it was to sit down in this giant dress.  I am not crying.  I am laughing.  A lot.


The gala was amazing.  Lots of fun with lots of costumers.  Robin didn't get a picture of the group but she did get a picture with Lauren from Americian Duchess.   And I ripped a group picture from FB.


Monday, March 9, 2015

Mill Farm Robe a la Francaise plus an update and lots of pictures- L

Dear Pattern, can we talk?  You are not holding up your end of the bargain.  I'm glad you weren't terribly expensive because you have no pictures.  Just words.  And your words are nothing like the words I would choose to describe specific actions.  I'm thinking I need to re-watch this week's Downton Abbey because I spent the entire episode trying to figure out what you meant by pleat at AA and BB. That said, your shapes seem to work quite well once I change them for my bust.  And that is a separate rant.  There are no tutorials for doing a full bust adjustment with a shoulder pleat.  So here is a picture of my best guess.


Updates to this dress are now in a new post here

 And here is the first fitting.  Not half bad.  Too long in the waist and a few more tweaks.  I have already cut a new, improved version that I will fit very soon.  Due to the FBA at the shoulder, I have way too much width there.  Luckily, I can just cut it off.  That thing that looks like a cape coming off my shoulder is the body of the dart.  It's pretty darned big.


And in the mean time, I finished the beaded octopus for the nereid corset.  The colors look very dull in the picture.  I included a picture of the back.  And I did make two of them.  It has exhausted my desire to bead anything.


AND FINALLY
 I dragged my gimpy self out of bed and took WW1 Outlander pictures.  I was hoping for a foggy morning.  And hoping I could find my son's old kid sized golf club.  I had to settle for holding balls (yes, I went there) and a vintage tennis racquet.