New pictures added below.
Queen of Clubs. All hope is not lost. I've made a lot of progress in the last few days and have decided to re-assemble most of my posts in one place.
The Demode Court Dress for CoCo meet-up was delayed by one year. This was a very good thing for me. I had originally thought I could drape this without a pattern. I now know this was wrong. Maybe another time. This is my first attempt at anything earlier than 1850 and I went right for something remarkably difficult. Not only that, though, I chose an inspiration dress that is a victorian fancy dress. I'm on my own to figure out how to make all the trim look 1770's. Or even something sorta kinda like that.
Last year I made stays and giant pocket hoops. I also made a chemise.
Earlier this year I caved in and got a pattern. Mill Farm. I got it because it was cheap and I knew that I'd have to do a lot of modifications. While the shape of the pattern is accurate, I find it confusing. More confusing than it needs to be, mostly because there are no pictures or drawing in the instructions.
Step one. FBA. I couldn't find any help online for increasing bust volume for this kind of dress, so I made it up. It actually worked pretty well. Robin helped me fit and there were only modest changes. But I was laced too tight. When I checked the second muslin it was too small.
I 'fixed' it again and went ahead and cut.

I also cut organdy for an under petticoat. I used Kendra's post for help in getting it put together because I really had NO IDEA. None. Pretty sloppy the first time through but it worked and won't show at all. I promise to do better with the proper petticoat. Really. I have a picture but is is trapped in a device with a broken power cord.
 So I have cut my cheap poly taffeta for bodice, petticoat, sleeves and skirt (including the pleated francaise back). I chose cheap fabric because I wasn't sure I could do justice to a project this size and I just couldn't spend a ton of money on an abject failure (remembering the disastrous Edwardian tea dress here - no link for the obvious reason).
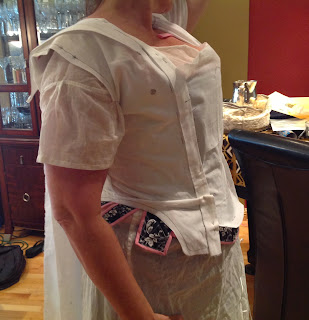
 I managed to put everything on - pinned together and fraying - just to make sure that it did, in fact, actually fit. Here is what I learned:
- Wow! It is really shiny!
- The bodice fits pretty darned good (there is a pin in the center back because it was a little big)
and the creases mostly go away when I turn up the edge of the bodice.
- The length of the petticoat is fine. I can do a little hem. I can now sew it up for reals including that 'doing a better job' part.
- Wow, it is REALLY shiny!
Next, I need to start deciding what I want to do about the decoration. Because it is time to start decorating the stomacher and front of the petticoat. I have to wait for Robin to get back from travels to fit the sleeves and the pleated back. I'm just not THAT flexible. Not in stays. My dress form is useless for this because it is nothing like my body. It is smaller than my measurements but the shoulders and back are larger than me. An expensive hanger. But very helpful for deciding what trim combinations I like. So there's that.
Fun fact - if I wear rubber soled shoes and drag my feet on the carpet, I could probably electrocute someone in this thing. More to come soon.
Or not so soon. And since I wrote the words above, I've learned even more. Most everything needs to be hand sewn. It's just too fussy to do on a machine and would actually take MORE time. Getting the dress to hand correctly over the hoops is difficult. I would pin it on the dress form, baste it and hang it right side out. And it would be uneven. The pattern was not designed to be worn over panniers so I was on my own to figure it all out. Attaching the skirt to the bodice with the pannier sides sticking out didn't work as simply as I expected and I just kept pinning basting and ripping out. Eventually it was 'good enough' and I sewed it into place. One area of dismay was sort of hidden by the watteau pleats and another was in plain view but my sleeves were often in the way. The sleeves weren't as difficult as I'd expected. Only had to baste them in twice. For the record, at this point I was fully sick of looking at shiny ivory fabric and had started to pin trim on the dress.
 First was trim on the petticoat (AKA the underskirt). My original color scheme and ideas had all flown the coop so I decided to put a large black band along the front and trim with ivory ruffles top and bottom. And I also added 3 big quilted ivory clubs between the rows of ruffles. I made the clubs by cutting the very ravel-y fabric with a soldering iron. I blanket stitched two layers of fabric around a layer of batting and then blanket stitched them to the front of the petticoat.
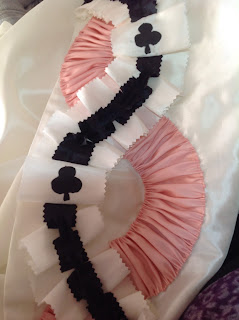
The sleeves flounces were attached before I sewed them to the bodice. Much easier that way. I wanted the trim at the base of the sleeve to be like the trim on the bodice. I tried about 5 iterations of black and ivory before I hit on the one I liked best. I had bought some 2 1/2 inch ribbon from the same fabric (in 3 colors) so i used that for most of the trim. I zigzagged some of the black fabric for a added contrast over the ivory. All the bodice trim was box pleated.
 And I also experimented with crocheting little clubs and tacking them to the flounces. It was a great way to channel the original dress, although a gigantic pain because I had to make 36 of them.
For the stomacher, I wanted some color. The Queen of Clubs was originally the only Queen which held a flower. And the flower was often a thistle. I picked some ashy pink ribbon with green accents and made flower that looked like thistles and then I tacked them onto the stomacher. For much of this hand sewing I had an assist from our new kitten, Eggroll. He's adorable and cuddly and proceeded to knock over a large birdhouse and break his own leg (not badly). This is just a part of the reason the poor blog has been neglected.
I also sewed the stomacher to one side of the bodice and used hooks and thread loops to close the other. super easy cheat!

 Last, and definitely not least, I added trim down the front of the skirts. I wanted to try painting fabric and had a clever idea to paint clubs on part of this trim. Problem was, I had to pin all the trim to determine where the clubs needed to go, and I needed to make a stamp because free-hand painting was a non-starter, AND I needed to check my paints to see which worked best. First I made a stamp out of thick craft foam backed with poster board and glued to a lipstick cover. This allowed me to get the most pressure without wiggling the stamp (and was also conveniently to hand). Then I did a test with the 3 paints I had available. Not all of them were stable after they dried.
 While the paint was drying I started pinning trim. I'd like to suggest I just whipped right thru it, but I didn't. All the pink ribbon had to be gathered down each long edge and ruches. All the ivory and black trim needed to be box pleated as I pinned so I could figure out where the painted clubs would be. And then I would just get sick of it and have to walk away.
 Once it was pinned in place I could jam some paper towels behind the fabric and stamp the clubs. I only screwed one of them up! Yay me!
I was happy with how it turned out but felt it needed some green in the bottom part of the trim (to go with the top). At this point, Costume College was a couple of days away and I hadn't started packing so I made some more leaves and tacked them in. No pictures were taken. I also decided to literally scrap together a mask from craft foam, spray paint on stick on jewels.
For the gala, I finally got to try it all on.
The wig turned out great, makeup was subtle (not bad for a first time through), and Robin took a picture that utterly disguised my wrinkles. Thank you Rob!
Also, a picture of how easy it was to sit down in this giant dress. I am not crying. I am laughing. A lot.

The gala was amazing. Lots of fun with lots of costumers. Robin didn't get a picture of the group but she did get a picture with Lauren from Americian Duchess. And I ripped a group picture from FB.


