Thursday, December 20, 2012

From the 1860s to the 1880s via Safety Pin

How can I possibly go to Lady Astor's Tea.  I haven't a thing to wear.  No, really.  I don't have an outfit from the 1880s and I really didn't want to attend in an 1860s (see this post for a view of the ballgown here: Lavender Ballgown at Dickens Fair) or 1840s dress, but I had an idea: What if I bustled my ballgown?  Would it work?

It did.  I started by shortening the front of the underskirt, then pulled the sides toward the back.  This created a little train!  Then I started pulling the overskirt up to the back, one section at a time.  An added bonus was that the flowers which are pinned at every tiered section became lined up across the back in a cute little floral display.


Here's a front view.  My dummy, Esmerelda, is currently adjusted to my uncorseted shape so you'll have to use your imagination for the bodice and apologies for the photo quality as these are excited phone pics sent to Lisa after I'd bustled it.

After viewing the pics, Lisa suggested adding a butt pillow (OK, it's a bustle pillow, really) but I stuffed mine more like a Renaissance bum roll as that would be the only thing holding the "bustle" up.  It worked.  Yay, Lisa!

The sleeves aren't period correct, but that can't be helped.  I realized, later, that I'll have to remove one side of the bustling to get into the dress.  I'm sure Lisa can help bustle the other side with me in the dress!


My first Bustle Pillow. Awww.

This just made me want to make a REAL 1880s dress with a bustle so big it will look as if a horse is under there with me!
The final results.....

Monday, December 10, 2012

Haradrim - Back with a new costume! - L


Robin talked me into going to a Lord of the Rings dance in costume.  I spent a lot of time looking at Elf dresses and Rohirrim dresses.  At pretty dresses on willowy girls.   I just couldn't do it.  I'm a bit more hobbit shaped, but I'm awful tall for a hobbit.

The one thing that DID appeal to me was being a bad guy again.  And female baddies don't exist in the films so I had a free hand to create something thematically similar without losing touch with my source material.

I decided to make a corset vest that looked like armor. The undervest would be attached but like it's separate.  Then I would have the bedraggled shirt and trousers with front and back skirting.


The brown leather on the vest is a faux distressed leather remnant.  The metallic designs are painted bits of maroon faux leather.  I used paper brads (scrapbooking materials) to look like rivets. Once I have this under control I'll be making shoulder and arm armor.  Maybe a stomacher...  And, of course, a turban and veil.  I have some fun plastic swords to use too.  I also get to distress the fabric.  Which I'm looking forward to.  Here are a couple of the pictures I used for inspiration.


Wednesday, November 7, 2012

UPDATED nearly final Dickens - piece by piece... L

 Here are some more pictures.  The bodice is closed with a zipper and the frogs are decoration.  I just don't trust them for the actual closure.  I'm probably going to add more trim.  I was going to add some of the same trim that's on the sleeves around the skirt.  I tried a variety of layouts, but never 'fell in love'.

I need this finished soon.  I am attending the Dicken's Faire in about 5 days and wanted something period accurate.  Not that a zipper is period accurate (neither is flashing one's chest).

I plan to post a picture of me, wearing this.  Assuming I remember to take a picture.


Last night I made sleeves.  I also decided to modify my skirt just a little.  I'll post a picture when I figure it out.

Robin points out that I am, yet again, being very understated.  Yeesh!  Clearly I just don't get it.  I'll just have to put it all together and see if I can pull out something nice.  Hopefully the skirt and bodice will compensate for the sleeves.  No WAY am I taking them apart to add stuff.  I'm also a little concerned about the plaid showing thru the lining.  But I don't think it will be that noticeable.  For the record, I think the bright royal blue is quite striking.

That's it for now.  Hope to cut the back of the bodice tonight, and maybe mess around with the skirt.

Here's a rough, pinned together skirt look.  Each fold-back is small and located at the bottom of the vertical skirt seams.  For perspective, they are about 8 - 9 inches tall.


Monday, November 5, 2012

Tail bodice complete - ready for the Bal des Vampires!

 I didn't get good pictures, but at least I got SOME pictures.  My daughter was working on her polonaise up until the last moment.  She didn't finish the trim around the neckline and had to guess where to place the decorative frogs on the front.  She plans to update it soon!  Also, she added cute trim to the skirt which you can't see in the picture.

I have my cloak thrown over my shoulder.

Wednesday, October 31, 2012

Quick Dickens - L

Wow.  So that title almost came out really wrong.  This year I wanted to wear something from the 1840's - 50's to the Dickens Faire.  IF I HAD TIME.  I finished my tail bodice and my cloak (pictures tomorrow!) and I'm mostly done helping my daughter with her polonaise and my son with his Halloween costume.  And then Hurricane Sandy hit the east coast and markets were closed for two days!  Work from home for me!  Making me one of the few that actually benefited from this disaster.


This is a very sketchy picture of my idea for the skirt.  The blue triangles are where the skirt panels fold back (reverse), showing something fluffy and white underneath.  The trim is not set in stone.  And the fabric is a blue, black and white check/plaid.


   Here's a sample of the main part of the skirt along with a piece of the piped reverse that I added at the seams.

I'll post more when I do more.

I'm not even sure I will actually have time to do this.


Thursday, October 25, 2012

Comments and Cloaks - L

First off, APOLOGIES if you have commented and we never replied.  I really do check comments all the time.  Sometimes I see a comment that is a week or two old that wasn't 'there' yesterday!  It's difficult to decipher the mysteries of the interwebs.

I have finished my cloak/cape (what IS the difference?) except for the hem.  I'm purposely waiting in order to allow the bias regions to finishing drooping.  As always, I can't leave anything alone.  And Robin joined me in making this very easy pattern just a little more difficult.  As I mentioned (or not) before, I wanted pockets and a different hood.  Robin wanted a different collar.  Both of us wanted a removable hood.
And now I have pictures:

 In order to pull a ribbon thru the hood to allow me to pull it tight as I run thru a storm, on the moors, chased by unnamed evil, I needed a buttonhole on the inside of the hood (the lining layer).  I reinforced it with some VERY heavy weight cotton.

Next, I wanted some reinforcement thru the hood where I planned to run the ribbon.


Here is a picture of the twill tape I sewed into the hood.  The red circle is where I placed the buttonhole opening for the ribbon.
This shows you the rough shape of the new hood I drafted.
The curve at the bottom is where it attaches at the collar.  It really makes a nice drape around my face.  Also, it is big enough to hang well over my forehead.  Or I can fold it back in the front.

Apologies for the miscellaneous bits of black stuff that also clutters the picture.  It is all part of the band that I sewed around the neck.  The band has 5 buttonholes in it that correspond to buttons under the collar of the cape, meaning I can remove the hood entirely.

Here's the band.  It's bumpy and uneven looking, but one side is hidden where it attaches to the hood.  I brilliantly chose the bumpiest side to hide!


Once I sewed the hood to the band, all I had left to do was hand tack closed any spots that were too think to sew nicely.  All in all, much of the detail doesn't deserve close looks.  But black on black is very forgiving and I don't think anyone will notice.

I also took a quick picture of the body of the cloak and hood hanging up, to show my pocket.  Yeah, it doesn't really show so I added a bright circle.  I also used another favorite technique when I sewed down the collar.  I top stitched the under collar for extra strength but didn't want any contrasting thread to show on the lining.  I used black thread and a burgundy bobbin.  Worked like a charm.

This weekend I will add a hem, and it's done!  Back to sewing hooks and eyes on the tail bodice (yawn!)


Monday, October 22, 2012

Halloween interruption - part 2 - L & R

We had a long postponed sewing day yesterday.  It had been AGES (OK, months)...

We had recently found beautiful lightweight wool on sale and bought enough to make cloaks. We both had the McCalls costume pattern and we both really wanted a cloak.  And really, who doesn't?

Robin chose ballet pink as lining under black crepe wool.  I chose a dark burgundy under a woven black wool.  We each chose to make modifications.
Robin loved the full hood that gathers around the face, but she didn't like the simple rolled collar.  She made an large upright collar trimmed with a ruffle.  I had initial qualms, but it turned out fantastic!
I kept the rolled collar, but wanted fewer ruffles around my face so I redrafted a more traditional hood.  I haven't finished it yet so I'm not sure how it will come out.

Both of us wanted the hood to be removable.  We are attaching the hood under the collar with buttons.  Oddly, Robin suspects she will rarely use it, and I suspect I will keep mine buttoned on.  But options are awesome.  We had the, admittedly, silly idea that we could complete these in a day.  We did not.  One thing that slowed us down was my needing to help my daughter on her polonaise.  She's nearly done now.  And she used some of our precious sewing machine time. In addition, I was slowed dramatically by a major sewing error, when I put the wrong pieces together on the outside of my cape.  I didn't discover it until I was nearly ready to sew on the collar.  I had to take practically the entire thing apart to fix it, but it HAD to be done.  It was hanging very oddly.  We didn't take pictures.  We were busy cutting and pressing and pinning and sewing.


Robin has also been busy with Halloween stuff:  She and her beau went to a Zombie Pub crawl.


Eating innocent bystanders


Needed an quick, dirty and cheap Zombie costume for a Zombie Beer Crawl so off to the Goodwill.  I found a lovely blue and white checked number, so innocent and sweet.  I thought that it, plus my little bowed flats would contrast nicely with the Zombie makeup.  I ordered a wig (Jailbait is its name) from an online costume house, pulled my own hair through the front and stuck leaves in it. Then I did my zombie makeup.  I think I died in 1982, so should be well-rotted by now. I had a slit in the abdomen of the dress through which peaked a “festering sore” bit of stick-one makeup.  All in all, I terrorized many a child and a few adults, too! - R

Arwen/Eowyn - Elf or Human, what to be, what to be....- Rob

Misses CostumesMisses CostumesM4997I wanted to be an elf, but Lisa convinced me that everyone would be elves and that the ears would bug me while dancing, so I ended up choosing Simplicity 4940 because it seems more of what Eowyn of the Rohirrim would have worn in Lord of the Rings.  I plan on creating something similar to Eowyn's green dress and order my fabric from Fashionfabricsclub.com - some olive green velour for the overdress and and olive green floral crepe for the under dress and sleeve lining. I'll have to create and underskirt and have the skirt be able to tie to the side to reveal the different material underneath.

I saw a tutorial for puf paint lace, so I'm going to give that a try for the yoke. Wonder what kind of undergarments would make this look good? Not only that, but this is for a dance, so I'll have to make some way to string up the hem for dancing.

Here's the material I found for the dress. The velour is a strange color.  It said it was olive green, but then, so did the painted material for the underskirt.  The velour changes color from brown to olive. I wanted a brighter olive, but, oh, well....

Wednesday, October 10, 2012

And now the annual Halloween interruption - L


Every year my projects are interrupted by my son's need for both a Halloween costume, and a costume for our town's haunted house.  He just keeps growing so the pirate costume has to be re-made year after year.  This year he isn't even at home!  He has a school camp for the week before the haunted house.  I had to make him a shirt without having HIM to measure.  Yes, I could have planned ahead, but where's the fun in that?

I literally threw this together last night.  The shirt and cuff hems aren't done, and I want to practice tea dying with this.  I also want to try to distress the edges since he's supposed to be a ghost pirate.  The cat will provide the obligatory shedding, but not the shredding.  She's just to old to care.

I had no pattern and roughly based this on the renaissance chemise pattern.  I made up a simple stand up collar and a faux yoke.  Now on to Halloween!

Add caption

Wednesday, October 3, 2012

Just a quick update - L

Just a quick progress update.  The collar is on.  I'm still tacking in boning and pleating the tail.  The pleating is more difficult than I would have thought.  It seems more obvious than it is.  I pin together and put it on the form.  And it hangs crooked.  So I pin again - etc, etc, redux.

After that, all I have to do is the front closure which I haven't chosen.  I have something showing up in the mail.  Maybe soon.

Also, I handful of the talented women I've met thru the 1912 Project have started up a facebook group for FBA's and other pattern adjustments around a big chest and a small back.  We are trying to band together to help each other get better at our abundant fitting challenges.  (you like that pun?)

If you are interested, contact me via comments.

As an aside, this bodice fits me.  It is tight on the dressform.  And yet I do not look as svelte as this dress form.  This is due, I think, to my very narrow back.

Friday, September 28, 2012

Tail Bodice and sick days

I have been in bed, sick for a week.  During that time, I did a little sewing, but not much.  I sewed trim to my bodice by hand.  Since this bodice is bag lined and some of the trim is thick, I decided this was the best solution.  As a reminder, here's what I'm working on:
1883 Tail Bodice
This is the Truly Victorian Tail Bodice and I'm really excited about my progress.

I started with this maroon and black print in polyester.  I'm lining the tails in burgundy, the sleeves in black, and the main part of the bodice in burgundy canvas.  Why?  Because that's what I had laying around.  The goal of this bodice is to channel my inner steampunk witch.  Much of that will be achieved with accessories, but I needed an elegant 1880's bodice as a foundation.

This has been a game changer for me in many respects.  I caved in and bought a full corset.  It fits better than I expected, and really makes the silhouette better.  I also caved in and bought a 'perfect pleater'.  I love pleats.  I hate hand pleating.  I'm too impatient to make them even.  It's also the first Victorian outfit I've made without fitting help.  Which is challenging.  My dress form is NOT a good representation of my body.  It can't be forced into a configuration that mimics me. So far everything is working out.....


 I made a muslin, and then cut fabric and lining.  I sewed together the lining and used that for fitting.  Now I'm sewing together the actual bodice and adding the trim before I add the lining.  It's been interesting.  I had bought some black lace, beading and braid, knowing I would find places to use it.  And this is definitely the place!  I made a tube of black lining, pleated it, and sewed it to the bottom edge of the front with black braid.  Then I added some beaded fringe to the bottom.  I was going to use the same trim around the neck, but the pleating seemed like too much (I know, I know, never too much in Victorian dress).  So around the neck I'm just using two rows of braid.

Since I will mostly wear this to Steampunk things, I added pockets to the front.  I also added a couple of sewn-in D-rings inside the lining so I can attach gear as needed.


I opted to use a less 'assertive' beaded trim on the sleeves.  Beads catch on everything and I didn't want them getting in my way.

For the record, the sleeve opening are very large.  (or I have really tiny wrists)

I am modding the collar to look more like Maleficent, extending over my shoulders but up and curled.  Pictures soon.  I keep making samples and they keep being to small.

Once all the trim is sewn and the collar attached, I'll sew in the lining and sleeves.  Then I have to wait to get some collar wire to hold that collar in shape.   In the mean time, here is what the bodice trim (and welt pocket) look like:


Tuesday, September 4, 2012

Long weekend - Short sewing - L

Well I didn't get much done this weekend.  I supervised a lot of stuff, but not much for ME.  And mostly it's all about me.  Right?

I crocheted this little tiny top hat (meant to be a fascinator not an actual hat since it's only 2.5 inches across the top).  Then I made what I have dubbed the Tesla spheres as a decoration.  I still haven't put them together, and I still need to clean some excess glue off the ... thing.  What DO you call it?

I have a couple young ladies who are interested in making Victorian costumes for a variety of upcoming events.  They each wanted to make a skirt, petticoat and the TV Polonaise.  And that was not gonna happen.  Both are beginners.  I don't think I could get two beginners through this much sewing without losing my mind.


In the end, my daughter made a skirt, and is starting the polonaise.
Her fabric is just so cool.  She has her skirt done except for the hem, and potentially trim and has already sewn and fitted a muslin.  This weekend, she cut her fashion fabric and her lining. And since that is a :LOT of cutting for a newbie, we sewed up her sleeves and the bustle part of the dress.  That way she gets to feel 'progress'.  The main part of the bodice is gonna be a beast for her, but I think it will be the single cutest costume I've been associated with.  Next time we get started on the petticoat.  NOT so much fun.

Her friend decided, after reviewing the work involved, that she would be good with a skirt.  She has 6 or 7 corsets so she can wear them over a black skirt (with or without a top underneath) and look really cute.  She made a black skirt with the 'super easy' unstructured waistband.  And she's happy.  She decided that was enough stress!
And sure enough, the skirt looks great with her black and white corset.  She may make a chemise top and a petticoat.  If she feels like it.  Either way, she can steampunk with the best now!


Monday, August 27, 2012

Sewing for fun - L


Cut loose from calendar obligations (needing a costume done for an event) I have gone a little crazy, indulging every whim that wafts thru my head.  I could be taking this time to work on my elizabethan costume but I'm not.  Maybe soon.  My daughter and I decided to go to a couple of things in late September/early October.  I actually have something to wear, but I want MORE!  Plus, I was a little bored at work.  I went looking at dress blogs and pattern sites and suddenly decided I can't live without this TV Tail Bodice.  I had some fabric that I bought with the idea of making a Steampunk villain (a la Maleficent).  I was trying to drape a bodice mashed up from a couple of different patterns but I wasn't excited about the results.  Now, suddenly, I'm excited.
Here's a really bad picture of my fabric (the upper right corner is the closest to reality).  I don't know how long the tail will actually be.  I don't have the recommended amount of fabric for the longer tails.  But my fabric 60 inches wide so I may be able to cut carefully and squeeze in some length.

I have decided on a neckline yet.  It will depend on how the muslin looks.  And herein lies a a new thing.  For the last year or so, I continue to be challenged by fit. And while I'm able to get the garments to fit, I don't like how they look.  I've come to the conclusion that I need an overbust corset.  That means I'll have to make one.  I simply can't justify the expense of a custom corset, and off the rack doesn't come in my size.(After writing this, I caved in and BOUGHT a corset.  I doubt it will fit well, but it was clearance, and will fill the gap until I can make one)


I went ahead and made a muslin.  I love the TV patterns, since they allow a lot of sizing flexibility.  I tried it on and it fits really well.  Only needs dart adjustment.  I will wait for my new corset before I make a final determination on fitting changes.  I can already tell that the pleats in back will be a pressing challenge.  They are not on-grain except the center back.

I love this pattern and suddenly have about 3 or 4 things I want to make with it.

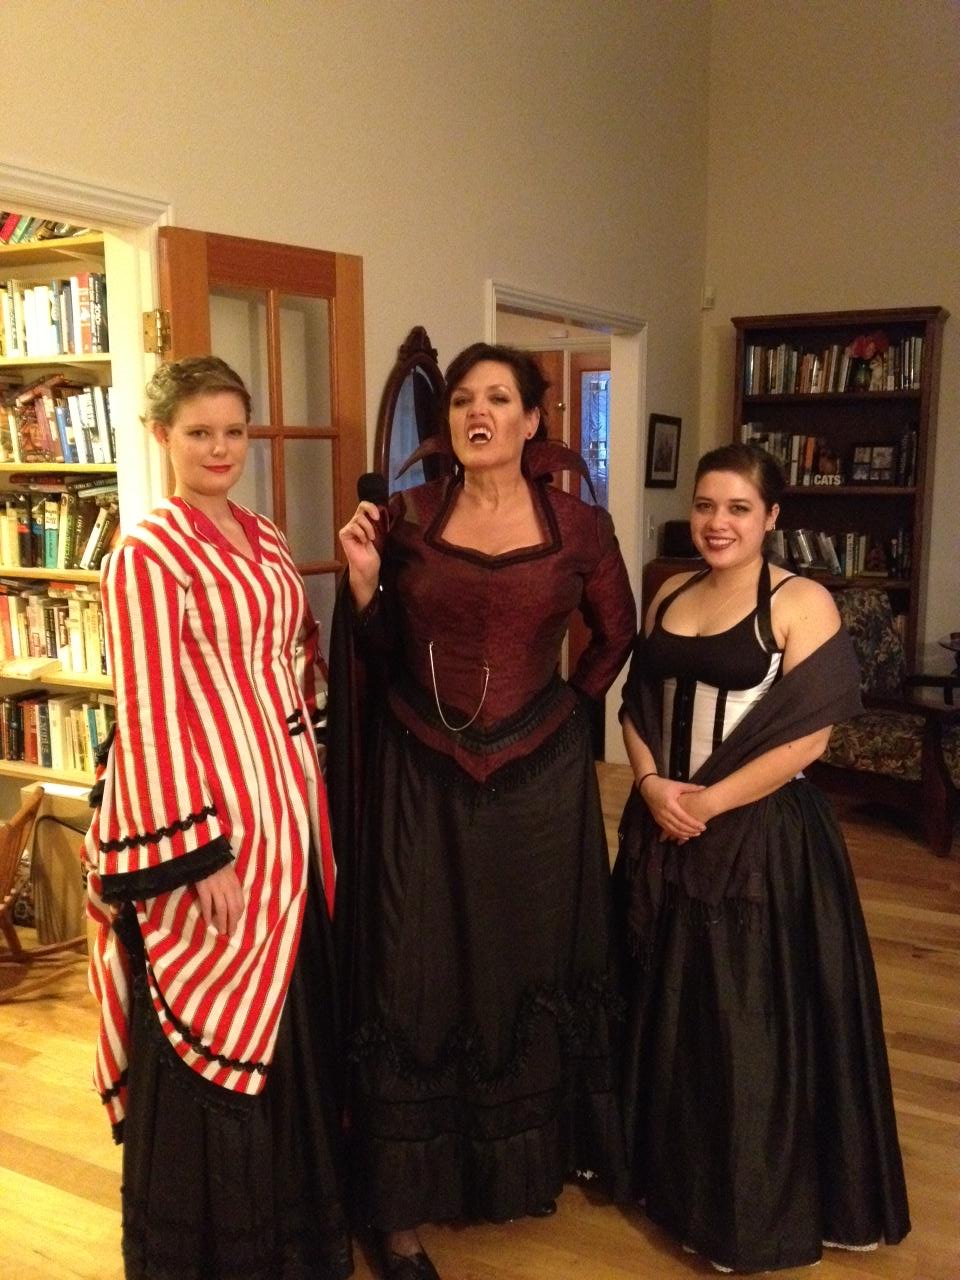
My daughter has decided to make a polonaise.  I am providing guidance ONLY and making her do everything herself.  It's going to be really tough for her since her skills are not robust.
She already made a full black skirt that is a gathered tube with a waistband.  She's made a muslin and we fit it.  Now she needs to cut her lining and her fabric.  She's going for a bold look with this red stripe and it's gonna be amazing.

I also found a great free tutorial for a butterfly bustle at Your Wardrobe Unlocked.  It's very simple.  I had some cheap lace fabric, and even cheaper faux gold/black taffeta.  I put them together and made the bustle.
Here's how it ended up:


A bit higher and poof-ier than I expected however I haven't' sewn the center back pleats to the waistband.  I'm thinking of attaching a ribbon to allow be the adjust the height of the center pleating to go with different bodices and vests.  It's really pretty.  You can sort of see thru the lace and get a shimmer of gold.  The extra poof comes from using cheap polyester fabrics.

Then I had another mad rush of things....just THINGS.  I finished the little metal decorations for my black steampunk skirt.  I decided to make them removable both for cleaning and to give me flexibility using the skirt.  AND I decided I wanted to crochet a little top hat fascinator.

(I wasn't lying...my poor brain has been bustling with ideas and the projects I had were not fulfilling my costume creation needs)


Here's the metal decorations.  They are connected via a copper chain.  And then...

Hat on a cat!  I just need to crotchet the rim.