Friday, June 29, 2012

Renaissance Man's outfit


Image of the pattern cover.

I've been told that "men don't wear OUTFITS" , but what else do you call this?  My patterns are from Margo Anderson's Elizabethan Gentleman's Wardrobe, which you can find here: http://margospatterns.com/Products/ElizWrdrb.html
I gave Roger a choice of pant silhouettes and he actually chose the pumpkin pants, stating that if he was going to wear a costume, he was going all out. Good on him!
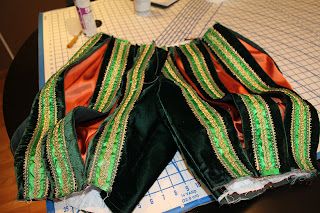
The fabric is green velvet.  The doublet will be the one on the right, with a lot more trim but with hanging sleeves for temperature control.  The pumpkin pants will be green velvet backed with orange satin charmeuse and lined with cotton muslin  with orange charmeuse puffy underpants poofing out between the strips. Roger has already chosen his green and orange pheasant feathers combined with a grey ostrich feather for his cap. This year it'll be a flat cap because I'm not sure I'll have time to get heavy duty into millinery.  I already made his shirt, blogged here:http://idlehandsthems-fitsworkshop.blogspot.com/2012/05/i-shall-make-you-cambric-shirt-mens.html

Note:  I'm particularly indebted to this site:http://www.elizabethan-portraits.com/ , a source for much inspiration.

OK, it's now taken me days to unfold each page of the pattern to search for the proper pieces for the men's slops. Margo makes great patterns but there are so many pieces that finding what you need can be time consuming. I've decided that the canvass I have on hand will just have to work for these pants as the thought of yet another trip to Joanne's is killing me.
Last night I finally got down to cutting and actually sewed some seams. Oh, the progress! Before I got there, however, there were ADVENTURES IN DYEING. I stove-top dyed some muslin to use as the pant pane lining but I didn't agitate it enough and it came out blotchy. The next day I threw that and some undyed muslin in the machine, added a huge pot of boiling water to the machine's hot water and ran it through the agitator three times. Still splotchy, but different hues.  That's ok, the material will be used in different parts of the outfit and really won't be seen....much.
I cut out the base in canvass, the inner lining in white muslin, the panes in velvet, interfacing and dark green muslin for lining, and the orange charmeuse for the underlay that shows through the panes.  Next up will be adding the decorative trim.

I cut the lining by tracing from the pattern. Then I cut the interfacing.  The instructions said to trim off excess to 1/8 inch. Well, my seam allowance is 5/8 so i said to myself" Why don't I just cut them less 1/2" on each side and I won't have to trim?"  Nice idea except I forgot I did that, then used the interfacing as the template for the velvet.  That's why my velvet is skinnier.  That's why I will have to either re-cut the velvet or cut another two panes. I think I will just cut two more panes, even though the lining will be a different shade of green I used it all up).  Oh, well....
And today I realized that I basted the center pieces incorrectly.  I was supposed to sew the outside seams together, turn them, THEN baste the remaining raw edges.  I realized that this morning as I was going over how to put it together in my head and realized I'd screwed the pooch messed up yet again. At least I won't have to re-cut.....That is two "Doh!" experiences in a row.


Then THE DOG ATE MY HOMEWORK! Seriously, I came home to a masticated mass of pattern paper. That dang dog had MOVED A CHAIR in order to get up on it and get to the top of the dining room bureau to nab those pattern pieces.  I was too distraught to even look at what was damaged, I just gathered it all up and threw it in a box with a lid to be dealt with later. I'm not a fan of jig-saw puzzles and this will be a big one. Those patterns were expensive, Here are the decorated panes for the slops or pumpkin pants.  The panes go over the canvas base and charmeuse gathered overlay, then the overlay is stuffed with netting. The decoration is a 1 1/2' satin ribbon with gold 3/8" gold braid in the center, 3/16" gold looped braid on each side of the ribbon, and a looped green and gold braid next to the looped braid.  All in all, very fancy!


The pants are basted together and ready for the cannions.

Can I tell you how difficult it is to work with velvet? I'm doing everything I've read about, from using basting spray, hand basting, using a lot of pins, etc. and the velvet still crawls and wiggles all over the place.  I don't have a walking foot for my machine.  I've loosened the tension.  I sew a bit, release the pressure, sew a bit more and yet, I can't get it right.  It's not something you will be able to see unless you inspect closely, but there is not a perfectly straight seam anywhere on this garment.  I'm hoping the trim will distract the eye from the imperfections.  Of course, my boyfriend doesn't notice any of the mistakes and thinks these things are wildly funny. He even asked "Will these pants make my butt look big?" to which I answered with a resounding "Yes!"

Renaisance Dress


Image of the pattern cover.

I'm  changing my mind almost every day about my Ren dress. The more I look, the more I see that, unless it is a doublet, the top and skirt are the same fabric.  I had wanted to do the bodice in the same green velvet that my SO will have for his doublet, but I didn't want the heat of a velvet skirt (and it would break my heart to drag vlevet on the ground). I'd originally thought to have the bodice in green velvet and some thicker trim made of green velvet strips  going down the bodice and along the skirt front edge and the bottom, but the more I think of trying to tie Roger's green velvet in with mine, the more problematic it becomes as I look into working with velvet. It seems that cutting velvet strips and sewing them on will be a nightmare and trying to make velvet piping would probably drive me to drink.  I have enough of the clay silk to do make both a bodice and the skirt, so no worries.   So here's my new idea:  Clay dress, skirt and sleeves - find some interesting lining fabric for Spanish or hanging sleeves if I decide on that or just do the paned sleeve with bigass puff and shoulder boulder strips with puff. (Lisa tells me she's doing the shoulder roll with paned sleeves, so that option is out for me.  We-just-cannot-be-twins rule is in effect. Need to find some sort of satin ribbon to decorate with, maybe rust?  Roger's will remain the same: Green velvet doublet, velvet paned sleeves, velvet paned pumpkin pants with that orange charmeuse showing thru.  The closer I get to actually doing it, the simpler my design will become! I'm so confused.
For the fore panel, here's my inspiration:


http://www.marileecody.com/gloriana/elizabethhardwick.jpg 1590ca. Elizabeth attributed to Nicholas Hilliard (Jesus College of Oxford University)All of that design was embroidered by one of Queenie's good buddies, Bess of Hardwick on the figure on the left.  I have silk drapery fabric for the background and I'm going to use the wrong side of the fabric to boot.  I've download a bunch of Jacobean embroidery designs of birds and flowers (couldn't find any fantastical animals already digitized) and I'll start hooping soon. Just this part should take a long time and a boatload of thread! After it is embroidered, I'll cut it out and back it with canvass. I'm not making an entire skirt, just a forepanel. In the interest of temperature control, I will fore go the underskirt and just velcro the forepanel to the farthingale. Th figure on the right I like because of the pearl detailing. I don't want the huge sleeves on either examples, though. Huge shoulders, yes. Huge sleeve, not so much.

What I like about the black & white outfit  is the interesting use of trim and THE PEARLS!.  I have amassed a selection of pearls with 50% off coupons and I plan to go pearl crazy, as much as I can. I also like the sheer partlet cuz I don't like exposing my chest to the sun, but I also like the big suportasse that some ladies work and I'm not sure how to get them to play well together.  Most of the pics I've seen of costumes show the partlet open, but, historically speaking, on an older woman such as myself, the partlet would be closed. The partlet on the lady in blue is one example I'm thinking of emulating. I will NOT be making a ruff this time.  I also LOVE Bob Mackie's "joke" version.  To the modern eye it looks over-the-top, but if you look at the "bow portrait" of Elizabeth, it's not even close to over-the-top.  I'm glad I finally found a portrait using bows so I can include them on my dress somewhere! I love bows and I haven't seen them used in a lot of the costumes I've researched.  Bows on!

My pattern is from Margo Anderson's Elizabethan Lady's Wardrobe which you can find here: http://margospatterns.com/Products/ElizWrdrb.html  
I've already made the farthingale, blogged here: http://idlehandsthems-fitsworkshop.blogspot.com/2012/04/renaissance-farthingale-robin.html and am almost finished with the corset:
http://idlehandsthems-fitsworkshop.blogspot.com/2012/05/elizabethan-corset-r.html and, of course, that ridiculous bumroll!http://idlehandsthems-fitsworkshop.blogspot.com/2012/02/who-wants-to-wear-inner-tube-around.html

After spending many hours pouring over online fabric choices, I've decided that the sleeves will be lined in the velvet that I already have for Roger's doublet and pants. I also started the machine embroidery for the fore panel.  This is a lot harder than I thought and will be very expensive. I did wait for a 50% off thread sale at Joannes, but these designs will take a lot of thread! I bought my designs at emblibrary.com.  One of the problems I've encountered is that, depending on what printer you use will give you a different result on the colors that print out. I tried to use the Thread Exchange on their site, but trying to actually BUY a specific thread color is ridiculous. I will just make do with what I've already got. Add to that the fact that I can hardly tell which design is which once it makes it from the embroidery card to my machine and that makes for all sorts of problems. I thought I could just start it and let it stitch while I sewed other parts, but I keep having problems.  Last night, right in the middle of a design, I developed massive thread nests and had to stop mid-design and take the machine apart. Sheesh! I've re-hooped, changed needles, changed tension (resulting in a nest of thread, thank you) and all this after stitching a perfect test pattern. Argghhh! This is going to take forever. Here's a pic of what I've done so far:

Thursday, June 28, 2012

My 'List' and my new favorite term - FARP (L)


Here’s the things I have on my list.  The stuff with a time limit is first, and the rest are in no particular order.
Must do soon!
Dickens Day Dress - in progress
Ren Dress - barely started
Dickens Evening/Winter Dress - fabric acquired
1912 skirt - muslin made, soutache 75% done
1912 blouse - a glimmer only

Repair/Update
Hem brown cotton Steampunk skirt (it's been a year)
Shorten black skirt and add metal ornaments
Shorten white Steampunk petticoat
One last ‘fix’ to the folding bustle

Make this year (I hope)
Jacket – True Grit – no pattern, beautiful fabric
Jacket – Miltary – no pattern, grey and red
Bodice – Maleficent – no pattern - burgundy print and black lace
1911 Day dress – Peach asian print lawn
1940’s wrap dress – seaglass lawn
Ass Kraken - metal bustle with light-up eyes!  (I have the parts and materials)
Any other 1912 things that pop up.
Black or dark grey cloak - just need to find FARP (Fabric At a Reasonable Price)

BTW we are about 22 points away from level 2.  I really want to get that skirt done! 

I am also considering the LOTR and Regency and Gatsby stuff.  I know I will look awful in those so it is tough to get motivated.  Although, after a moment of inspired thought, I may do the Gatsby thing as cosplay Dora Carrington....  (trousers FTW)


Wednesday, June 27, 2012

Rob's Project Wish List

I was reviewing all the projects I've got lined up and I started to panic a bit. I now vow to stop buying fabric until I get through at least three quarters of the projects  for which I've already bought fabric.  Here's my Wish List:

Finish Vic day dress-The due date is August 4th for the Dickens Picnic, but I want the bodice done right away.  The skirt can wait while I keep working on the corded petticoat.  I have a cage crinoline made for a previous dress as my backup, but I can't hem the skirt (or attach the waistband) until I decide which one I'll be using.
Corded Petticoat - I only have 5 rows of cording done.  This is tedious and I go "white blind" quickly
Renaissance outfits for Rog and Rob- I have the fabric but not all of the trim.  I keep changing my mind on what I want my dress to look like.  Roger's outfit will be first and I plan to finish his doublet muslin this weekend and cut out his "pumpkin pants", sewing them up first so that the doublet will fit well over them. I was going to do the doublet first but, upon further research, found out it's better to fit the doublet over the pants and shirt. The shirt is done.
1912 Project Dress - I've downloaded the pattern and read about other sewists trials and tribulations with this dress.  I may just get this up to muslin stage in my size and put it aside for later.
Polonaise outfit in Seafoam green and black - I have the fabric and I borrowed Lisa's pattern.  That's it. I haven't done 1880's yet, so I'll need to make the bustle cage, too. This one is due in March of 2013, I think, for a Sherlock Holmes dance.
Decorate lavender Vic dress (actually finish it????) - I never really finished trimming this one as I ran out of time for last year's Dickens Faire. It is rather plain according to Victorian standards and I want to gussie it up a bit more.
Ballgown bodice for lavender Vic dress - The muslin is cut and fit for this and I have leftover fabric. I've read that Victorian women often had a ballgown top and a day top for one skirt.  Makes sense to me.  The Pagoda Sleeve on the day dress do make for some heated dancing, so I'd like to get this made up sometime this summer. I also have enough plaid material left to make a cotton ballgown bodice if I ever get around to it.  Maybe I'll work on both, but AFTER Ren stuff is done.
Regency - I bought some white Dotted Swiss on sale. I have the pattern, but I will need to make the corset before I even think of altering the pattern.  This one is a back-burner and I'm still lurking in the interwebs for inspiration.
1920's day dress for September 2013 Gatsby picnic - (Roger really wants to go!)I have some cotton voile fabric that may work, but no pattern. Gatsby can be either late 20's or early 30's and I just don't know which one would look best on me.  1920's would be more comfortable, but I have a feeling I'd look like a tank. Trolling the webs for inspiration, still.
Victorian capelet- I bought some lightweight midnight blue wool and some gray charmeuse satin for the lining.  I have the pattern for a full cloak but I want to make an elbow length version with a lot of ruffles along the edges. This has no due date, I just want it.
Cloak  - I have the pattern but am still looking for a sale on black wool. This cloak could be used for a variety of costumes, from Lord of the Rings to Victorian. And I just like capes.
Eowyn dress or Arwen dress - PEERS will be having a Lord Of The Rings Ball in 2013. I want to be an elf, but Lisa suggested we go as the Warrior Women of Rohirrim. I got the patterns (I love Joanne's pattern sale.  For 99 cents, it's worth it to buy the pattern just for a sleeve I like!).  I have linen, but this is in the future stack, also.
T-shirts/Tunics - I have several lots of knitted jersey that I'd like to make into tops.  Will I ever have the time? Who knows

As you can see, the Wish List is...extensive. I'm not one of those people who stick with one time period - there's a beautiful costume just waiting for me in every decade. I just have to keep my nose to the grindstone and keep on sewing.


I love this post!  We are so the same, and yet so different!  I too have this many things on my plate.  Mine are mostly crazy-ass steampunk stuff.  Where Rob likes different eras, I want to play with different materials (metal and cardboard).  And I can't dance.  At all.  Lisa

Catching up on too many projects - L

I've got too many projects on my plate.....
I finished the Elizabethan corset, allowing me to check the neck on the chemise.  I've added the blackwork and lace and finished the neck of the chemise and am nearly done with the sleeves.  All that's left is to sew the sleeves to the body and a little finishing.
That means my Elizabethan underthings are done!
(on to the dress)

I'm also working on my 1850's victorian dress (yeah, yeah, it started as 1840s but it's not really happening that way)

Today Rob is going to help me pick trim so I can get moving on the skirt.  I have a bodice muslin cut but it needs work.  Once that's re-done, I can fit the bodice and get going on that. I'm locked in that nasty space where there are lots of things almost done yet I can't quite finish.  A whirlwind of if-then's that are hanging me up.

Here are my favorite trim options:

 Fabric is a pale taupe and peach plaid.  That often looks grey and pink.  I got some grey ribbon that looks violet next to it, and some moss green that looks apple green next to it.  Sigh.

I've tried a couple more ribbon options including a dark olive (top picture) and a softer celadon with a sheer center (bottom).
(sorry for bad blurry pictures)


I also have a dark grey fabric scrap that I really like next to the plaid but it's both boring and impossible to match in ribbon.  I really hate the idea of making skinny fabric strips (translated - I don't like it THAT MUCH).

Once I pick the ribbon, I will have to corset up, put on my petticoat and the skeleton of the skirt.  Then I can determine where to put the trim and where to put the waist.  I cut it extra long because I didn't know how much volume the petticoat would
take up in the length.  I can also finalize the petticoat hem.  And if I was really smart, I would re-cut my bodice muslin before I do that so I can check the new muslin at the same time.  If the bodice still needs work, I'll wait.  If it seems good then I can steamroll ahead.

See...that last paragraph...all those little things that are sort of dependent on each other, are fussy, and, and, and...I will feel so much better when they're done.

Meanwhile, the weather is beautiful.  I suddenly want to take a walk on the beach.

Monday, June 25, 2012

Rob's 1850s Victorian Day Dress


1859 Pagoda Bodice            I'm building a Victorian day dress.  Lisa and I thought we'd do 1840's but the more we researched, the more 1850s we became. I'm using the Truly Victorian pattern for the 1859 agoda bodice.http://www.trulyvictorian.net/tvxcart/product.php?productid=8&cat=1&page=1  Here's the material and ribbon.  The solid pink will be used for bias piping/binding in a color called dusty rose.  The ribbon is trim, called dusty rose but it's a bit more orange.

 Here's the bodice back with the piped seams. Neat!  Except I forgot to "dive" the piping into the seam lines the first time and had to go back and re-do it. I've built the bodice, interlining it with silk organza, just because I'd read about it and wanted to see how it handled.  It's a bitch, wiggling everywhere when you cut it no matter how many pins you put in.  I ended up just sticking the pattern on it and cutting wide all the way around because of the shifting.  I then stay-stitched it to the fashion fabric, then trimmed it.  This will be lined in plain white muslin.  Here's the inside of the bodice with bone casings, waiting for the bones. Below you see my bone drying rack.  After I hand filed the ends, I sprayed them with silicone spray.


Pagoda sleeve lining
Sleeves with trim and piping, read for hand stitching


Here is the big ole skirt with all the plaids beautifully lined up.  Huzzah!  Below are trim ideas.  I went with two sets of trim spaced further out because.... it's a big ole skirt! I used a panel from the Truly Victorian Ballgown skirt http://www.trulyvictorian.net/tvxcart/product.php?productid=1&cat=1&page=1  but only lengthening one panel as a pattern, really just a trapezoid.


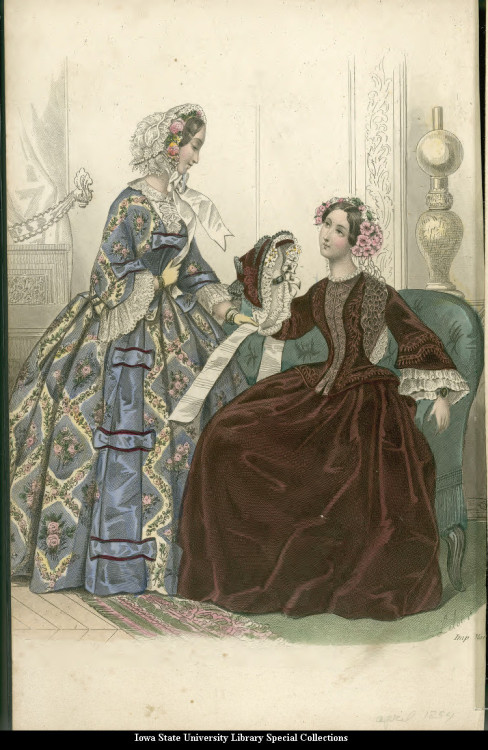
Fashion plate, 1854, the Lady’s Companion 
Here's the inspiration for my sleeves. I need to find some lace. Most plate I've seen show engageants or under-sleeves that are closed.  I need the air circulation cuz it'll be hot in August and I'll be dancing in this sucker!

Now I have to have another bodice fitting with Lisa for the final final and because I messed up a bit. You see, I made the piping, then sewed the bodice, but forgot to move the needle back into position, so my seam are 3/4" instead of 5/8".  I'm hoping that I have enough room in the side seams for that to be fixed, but if not, I'll have to rip and resew.  Pray for me.

 I made the waistband and finished the sewing the trim on the skirt. The remainder of the sewing will have to wait until I choose skirt supports - either the existing cage crinoline or the new corded petticoat, so the skirt is now "on hold". Lisa and I have scheduled a bodice fitting for next week, so the bodice is on hold. Onward to cording and Renwear!

Addendum: Worked on cording yesterday and FELT as if I was making progress, but when I check the time, found I'd used 3 hours to mark and sew only 10 lines of cording.  I've now decided that the skirt will be fit to go over the cage crinoline because, at this rate, I'll never get this petticoat AND the Renaissance stuff done in time. The corded petticoat is hereby relegated to the back burner nad my dress leaps forward in time to 1856+, when the cage crinoline was patented.

Update: Decided to get the petticoat all marked first and am still not done drawing chalk lines! It doesn't help that, with a broken foot healing, I can only stand on it for short periods.  Mark with chalk, ice foot, mark with chalk, ice foot. Ugh! Tedium comes in all fashions.

Blogged about our fitting progress here: Marathon Fitting

Progress report: After the Marathon Fitting session, I re-sewed the back seams. Because I was taking it in even more, the piping was too short, so I had to cut new piping.  This means that I will have to make additional piping to go around the bodice edges as this time I'd actually only made just enough instead of the usual 6 extra yards of just-in-case piping I made last time.

I piped the sleeve/shoulder join, taking the cord out of the piping at the armpit area. Hmmm.  This makes for a very unforgiving armhole.  I've hand basted everything in, and yes, it took me two tries to get the sleeves even and with a good distribution of fullness (the first time I ended up with a wad of material by the shoulder blade which looked terrible!). I panicked when I tried the bodice on and it didn't fit, but remembered I didn't have my corset on, so of course it doesn't fit right!  There's no getting around the fact that a dropped shoulder limits your arm mobility. Evidently that's the way it was, from my readings, to keep a woman's motions "demure".  On the previous Vic bodice, I changed the armhole and ended up with a modern shoulder.  This time I'm determined to get that period look.  If that means I can't raise my arms then so be it.  The bodice is looking very nice, but there is still a lot more fullness in the sleeve than the pattern drawing shows.

 I've now finished everything except the bodice closures.  Everything is taking longer than I thought! I also discovered that the reason I was struggling with hand sewing was that my needles sucked.  Once I grabbed a good needle from the cushion, the struggling ended.  I threw those other crappy needles away so I won't pick them up again!

I took 12 yards of thin silk ribbon and 6 yards of 1" wide silk ribbon and played with dye.  It took me several tests to get what I wanted.  Now I will sew the ribbons together to make a larger "striped" ribbon to decorate the bonnet.  Silk feels so wonderful but ironing ribbon is tedious. Dharma Trading has a good selection of woven silk ribbon
After I'd finished dyeing the ribbons, I threw the dye out then remembered:  I still have frogs to dye!  So I mixed up another batch and threw in 8 frogs. I got these at Cheap Trims . 


The frogs are ecru and took up a lot more dye than the ribbons, but I'm leaving them as is.

I got a few frou frous from Hats by Leko. Here's a pic of some vintage berries I bought earlier.


I'm not going to line the bonnet, just decorate it (I can always line it later but I'm pressed for time right now) I've attached the ribbon ties and crown ribbon and had the crown ribbon cross over in the back. I tried making some flowers, but the silk is floppy, so I need to figure out some other way to use the ribbon. Stay tuned.

While waiting for the day of the final fitting, I was wondering what to do with my hair. See, I chopped it all off in a sort of 1920's bob several months ago and am now growing it back out. I can just barely make a pony tail.  This will not look period appropriate, yet I don't want to wear the full wig I wore for Dickens Faire because August is HOT here. Instead, I found this at Voguewigs.com: It's a sort of drawstring bag/comb combination and should be enough for a stylish little chignon. "Why do I want a hairpiece if I'm wearing a bonnet?", you might ask. Because I know I don't want to dance in a bonnet!

Note: Got the hairpiece and it is BROWN! The color description mention red tones, but it is brown, so I'm sending it back and ordering one that mentions strawberry blonde in the description. They looked similar on two different monitors, but I guessed wrong.

Parasols: Lisa and I didn't want to spend big bucks on parasols, so we opted for those Chinese jobs. Yes, those types of parasols weren't popular until around the 1870s, but we've decided we are very forward thinking types with well-traveled connections who brought us back these little gifts. I found a used carved wooden cane at a flea market and had S.O. attach the parasol to it. That way I won't have to hold my arm so high all the time.  It came out pretty cute.

Lac for the sleeves:  After torturing myself with experimentation, Lisa gave me some lace and just said "sew it on, you are running out of time". Which I was, which I did. Mischief managed, it is done and looks good. May not have time for a lace collar, though....

HOOK & EYE TORTURE! I sewed on a bunch of hooks to the top without noticing that the package gives you a choice of looped eye or bar eye, but only half as many as there are hooks. So I went on to the next package and found I'd bought one size up! OK, I replace the smaller hooks with bigger hooks and sew them all on, yet I am minus one hook/eye for the neck closure in "stainless steel" color, so I dive into the stash for black and find out my black ones start the next size up!  So I have three different sizes of hooks and eyes on this bodice. I am terrible at this.  I've read many articles on how to sew these suckers on neatly. I follow the directions and I still can't get them to look tidy. Here's a great Threads article if you should feel inclined to find out how to sew them on properly:
http://www.threadsmagazine.com/item/23267/how-to-attach-hooks-eyes-snaps


Done!
I should be finished with the three frogs today so the outfit will be wearable, even if it is not "finished".

Yoked Petticoat update - L

Back from vacation, and I'm back to work on my yoked petticoat.  Being a 'robustly' shaped woman, I decided that I wanted the bulk of multiple petticoats, but not the volume around the waist.  After aggressive web search, I decided to try and make a two layer petticoat with the underlayer corded and the top layer ruffled and attach them to a yoke with a single waistband.  I made up a yoke from scratch (and scraps patched together see sally petticoat) and made a corded layer.  I plan to add some more cording at the bottom of this layer IF I have time.  I already have about 35 rows.  Next I made an A-line muslin layer and stitched 5 tiers of gathered tulle to it.   The plan is to attach muslin ruffles over the tulle ruffles to smooth them out.  I have enough room to add another layer over those two if I really need it.  But I don't think I do.

I used about 60 yards of tulle.  Pretty much a nightmare, but pretty!  I cut muslin ruffles about 3 inches longer than the tulle ruffles.  I want them to smooth the tulle tiers so I'm starting each one under the edge of the row above it and letting it hang down over the next row.  And I'm adding lace to the bottom tier.  In case I get dancing like a crazy woman and my petticoat shows!
(I don't really dance, but I do sometimes act silly)
This just sounds so simple and straightforward.  And it is.  Except for the volume.  For example, the center tier (pictured here) ... the base muslin is about 90 inches in circumference.  There is about 13 feet of tulle gathered for that layer, and about 10 feet of muslin I'm TRYING to gather over it.  I get it pinned.  I moved it to the machine.  I only hear about 2 pins drop.  I get the fabric in the machine and realize I've probably lost 4 or 5 more.  Then a random but of tulle pulls the thread out of the needle and I have to re-thread it.  The ruffle is shifting due to lost pins!  Sigh!

Here is what it looked like.  I felt like a marshmallow.
A very dainty, fluffy marshmallow.

Once I got 4 tiers of muslin sewn down, I tried it on to see how it was going.  I didn't bother with a corset, since my goal was to figure out if the length was OK and if the muslin layers smoothed the tulle enough to prevent a bumpy silhouette.

I got a couple of blurry phone pics.  Don't blame the phone, though, blame the dusty mirror.  I love the ruffled petticoat.  And the lightweight cotton plaid for my dress seems to hang pretty smoothly.  Hurray!  (I really did NOT want to make another layer)  You can just make out the canvas yoke in the picture.

After I finished I decided to add a piece of stiff interfacing to the bottom of the corded layer.  It gave me a better shape.  I also make a little 'pillow' for my backside.  Again, to help the shape
of the skirt.