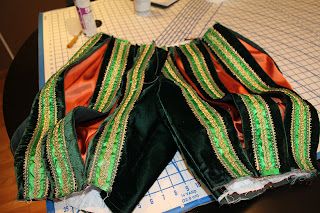
I've been told that "men don't wear OUTFITS" , but what else do you call this? My patterns are from Margo Anderson's Elizabethan Gentleman's Wardrobe, which you can find here: http://margospatterns.com/Products/ElizWrdrb.html
I gave Roger a choice of pant silhouettes and he actually chose the pumpkin pants, stating that if he was going to wear a costume, he was going all out. Good on him!
The fabric is green velvet. The doublet will be the one on the right, with a lot more trim but with hanging sleeves for temperature control. The pumpkin pants will be green velvet backed with orange satin charmeuse and lined with cotton muslin with orange charmeuse puffy underpants poofing out between the strips. Roger has already chosen his green and orange pheasant feathers combined with a grey ostrich feather for his cap. This year it'll be a flat cap because I'm not sure I'll have time to get heavy duty into millinery. I already made his shirt, blogged here:http://idlehandsthems-fitsworkshop.blogspot.com/2012/05/i-shall-make-you-cambric-shirt-mens.html
Note: I'm particularly indebted to this site:http://www.elizabethan-portraits.com/ , a source for much inspiration.
OK, it's now taken me days to unfold each page of the pattern to search for the proper pieces for the men's slops. Margo makes great patterns but there are so many pieces that finding what you need can be time consuming. I've decided that the canvass I have on hand will just have to work for these pants as the thought of yet another trip to Joanne's is killing me.
Last night I finally got down to cutting and actually sewed some seams. Oh, the progress! Before I got there, however, there were ADVENTURES IN DYEING. I stove-top dyed some muslin to use as the pant pane lining but I didn't agitate it enough and it came out blotchy. The next day I threw that and some undyed muslin in the machine, added a huge pot of boiling water to the machine's hot water and ran it through the agitator three times. Still splotchy, but different hues. That's ok, the material will be used in different parts of the outfit and really won't be seen....much.
I cut out the base in canvass, the inner lining in white muslin, the panes in velvet, interfacing and dark green muslin for lining, and the orange charmeuse for the underlay that shows through the panes. Next up will be adding the decorative trim.
I
cut the lining by tracing from the pattern. Then I cut the
interfacing. The instructions said to trim off excess to 1/8 inch.
Well, my seam allowance is 5/8 so i said to myself" Why don't I just cut
them less 1/2" on each side and I won't have to trim?" Nice idea
except I forgot I did that, then used the interfacing as the template
for the velvet. That's why my velvet is skinnier. That's why I will
have to either re-cut the velvet or cut another two panes. I think I will
just cut two more panes, even though the lining will be a different
shade of green I used it all up). Oh, well....
And
today I realized that I basted the center pieces incorrectly. I was
supposed to sew the outside seams together, turn them, THEN baste the
remaining raw edges. I realized that this morning as I was going over
how to put it together in my head and realized I'd screwed the pooch messed up yet
again. At least I won't have to re-cut.....That is two "Doh!"
experiences in a row.
 Here are the decorated panes for the slops or pumpkin pants. The panes go over the canvas base and charmeuse gathered overlay, then the overlay is stuffed with netting. The decoration is a 1 1/2' satin ribbon with gold 3/8" gold braid in the center, 3/16" gold looped braid on each side of the ribbon, and a looped green and gold braid next to the looped braid. All in all, very fancy!
The pants are basted together and ready for the cannions.
Can I tell you how difficult it is to work with velvet? I'm doing everything I've read about, from using basting spray, hand basting, using a lot of pins, etc. and the velvet still crawls and wiggles all over the place. I don't have a walking foot for my machine. I've loosened the tension. I sew a bit, release the pressure, sew a bit more and yet, I can't get it right. It's not something you will be able to see unless you inspect closely, but there is not a perfectly straight seam anywhere on this garment. I'm hoping the trim will distract the eye from the imperfections. Of course, my boyfriend doesn't notice any of the mistakes and thinks these things are wildly funny. He even asked "Will these pants make my butt look big?" to which I answered with a resounding "Yes!"


No comments:
Post a Comment