Showing posts with label HSM. Show all posts

Thursday, March 2, 2017

HSM Challenge 2 - Remake, Reuse - Lisa


skirt over large false rump
18th Century skirt based on the American Duchess Simplicity pattern 8161.  I say based because I didn't actually use the pattern.  I just measured how big the rectangles were that comprised the skirt.
I bought a skirt at the SF Opera Sale (years ago) that was distinctly too small around the waist but had a ton of fabric in a very nice weathered brown wool.  It's been sitting in a box ever since.

The Challenge is Re-make, Re-use, Re-fashion.  I took the waistband off the skirt and un-pleated it to discover 3 panels of 60" wool.  I only needed 2 for the 18c skirt.  I ripped the side seams down about 10 inches and re-pleated each panel to fit my waist.  The I needed to hang it over my false rump and raise the front panel to make the hem level.  Seriously, that was the hardest part.  Then, simply finish the waist with some spare cotton in the ugliest gold ever seen and add ties.  I can wear the ugly picket underneath and giggle softly to myself while I wear it.

If I ever have someplace to wear it.


front panel raised for a level hem

Friday, November 6, 2015

Secret Challenge and a swing coat - HSM/HSF - L

I bought some lovely fabric years ago.  It's a loose weave wool/silk blend.  It's a light, soft, medium drape fabric.  In fact, I got two different colors of this lovely fabric.  I knew I wanted to make a swing coat and maybe a capelet (or, ya know, something fun).  Every fall I tell myself  'I need to make that swing coat' but something else gets in the way.  Since I'm trying to burn down stash fabric, I simply HAD to get this done.  I live on the California coast near San Francisco so a lightweight coat is useful most of the year, and I love 30's and 40's clothes.  I'm using the Butterick '48 vintage pattern that was recently re-issued.  That makes this coat too modern for the HSM/HSF group, however the challenge is to add something secret to an item.  I seriously hope I'm not stretching the rules too much by adding an small embroidered pocket on the inside of the coat as my 'secret'.  The plan for the embroidery is to copy a tiny painting my grandmother made.  She would have worn a coat like this, and was as fashionable as she could be on her rather limited budget.  She loved birds and took up painting them in the latter half of her life.  The challenge is entirely around my embroidery skills.
See the secret pocket??

The coat

As always, I'm did an FBA.  Bust shaping in the pattern is accomplished with a shoulder dart at the edge of the shawl collar.  I was loathe to increase the size of this dart since it looked like it would add more volume at the center front than at the actual bust.  So once again, I added a bust dart.  Basically, I slashed and spread as if I was increasing an existing dart to create this dart.  I'm trying something new.  I'm making the changes on a tracing of the pattern from the waist up.  I marked the waist on the tracing.  I used this modified pattern piece as an overlay for the front, the interface and the lining.  It saved me having to make the modifications 3 times.  The added width from the FBA was perfect to allow me to add a button to a coat that wasn't supposed to have one.


 The fabric ultimately had too loose a weave and too much stretch for this coat.  Sadly, I'm not very happy with it.  Also, my poor choice of interfacing remains crunchy even after a few wearings and professional pressing.  Hanging  it on the dress form doesn't help but I've had the flu for over a week and couldn't bring myself to take a picture in it.

The happy, happy secret:

It only took three tries to get the bluebird embroidered.  It's been a VERY long time since that Girl Scout badge so I can't even remember the names of the stitches I used.  

Wednesday, September 23, 2015

The brown challenge - HSF/HSM - Lisa

I had a couple things I could make for the brown challenge.  Both from the 30's/40's with my Wearing History patterns.  Trousers and a blouse.  I actually made both, and started working on a swing coat.   I've planned to make the swing coat for the last two winters.  Wide leg trousers were popular starting in the 30's, though they were not common and not worn as everyday clothing.

Jean Harlow in trousers


I have a pin stripe cotton, mostly brown with a little blue, for the blouse.  I was going to get wool flannel for the trousers but I wasn't sure I would like how the pants looked on me so I declined to invest the cash.  Instead I got a dark chocolate rayon twill.  It has lovely drape, though it's not very forgiving of my bumps.   I actually bought all this quite a while ago and just haven't got around to sewing it.

Smooth Sailing Pants 
The largest size of the pattern is a tiny bit too small for me in most places.  It's definitely too small in the 'high hip' (commonly know as the 'pot' belly).  I altered the curve of the hip and altered the pleats and darts along with adding to the overall size. I also hand sewed the side zip because I've found that I get a smoother line.  Clearly I'm too lazy to go downstairs to press my work before pictures.

Hand picked zip - Not pressed
And now, a moment to talk about squish.  I have a lot of squish, and it's not all just fat.  Everyone should know their squishability, because it matters when making alterations.  I added room in the pattern to match my measurements and then, when the muslin seemed too tight in the waist, I added more.  But I shouldn't have because I'm squishy, and I know it.  If my pants fit 'properly' in the waist they are actually too loose and will slide to my high hip.  I find I need to squish in about 1- 1 1/2 inches (more if the fabric will stretch a bit when wearing).  I always have a little roll over my waist but I prefer that to droopy pants.  I added an extra inch to the muslin and ended up taking two inches out.  That same 'squish' factor means I need to add a bit of extra room through the seat.  When I sit down I squish OUT there (wearing ease).  Alternately, Robin my co-blogger, has almost no squish no matter what her size.

Welt pocket - Also NOT pressed 
A side effect of the squish alterations was that the legs of the pants are a bit fuller than they appear in the pattern picture.  The pattern is for straight leg pants from the low hip and I added ease in the low hip.  My final decision was whether to add a welt pocket on the seat.  I've never done it, so I HAD to try.   I haven't made the belt yet, but I want to do that, too.


Smooth Sailing Blouse
The blouse pattern fit, except the bust.  Because it's made of cotton shirting and buttons down the front, I wanted to make sure I added plenty of fabric.  No gap!  The pattern creates bust fullness through pleating below the yoke.  I added half my extra volume there.  I also chose to add a bust dart, along with a little extra length in the front.  Due to the extra volume at the bust, I added a second shaping dart at the waist.  I'm quite content with how it worked out.

A couple of surprises with the pattern; first, the yoke is not lined and second, the shoulder seam came out slanting back over my shoulder.  Neither one of these were a problem.  I'm going to use the pattern again, and I will likely line the yoke and will slash and spread to move the shoulder seam closer to my actual shoulders.  The yoke is fine without the lining and hangs nicely, but my next blouse will have the outside of the yoke cut on the bias (for stripe detail) and will need the support.
The shoulder seam placement meant that closing the blouse up to the neck wasn't a viable option.  It will be easy to fix in the future.  Note; this is related to MY shape, not a problem with the pattern.

Both these patterns were extremely easy to work with and the instructions were straightforward.  I LOVE them.  I'm also secretly happy that I matched stripes (sorta) at the shoulder.


It's 7AM!  Only time I had for pictures...


Monday, August 31, 2015

1826 cap, HSM - Lisa


1826 cap

I saw this pattern photo in about 8 different facebook feeds and liberated it for my personal use.  I genuinely want to address every challenge and my original plan was derailed by, well, a lot (more after the cap).  But I do have a lot of cotton organdy remnants from my daughter's cosplay and decided I could do something with them. 

I'm still working on my version of the Lowell Mill Dress and decided that an 1826 cap would be the perfect compliment.  This cap likely fulfills the 'heritage' part of the challenge.  My family is Northern European and roundly middle class so this cap makes sense.  But to insure I fit the criteria, I hand sewed it (so it could be sort of 'heirloom' too).  

The pattern comes with measurements and I copied them exactly, adding seam allowance.  Apparently my head is a lot bigger than I thought and I had to do it over, adding about 2 1/2 inches to the length (ear to ear over the head).

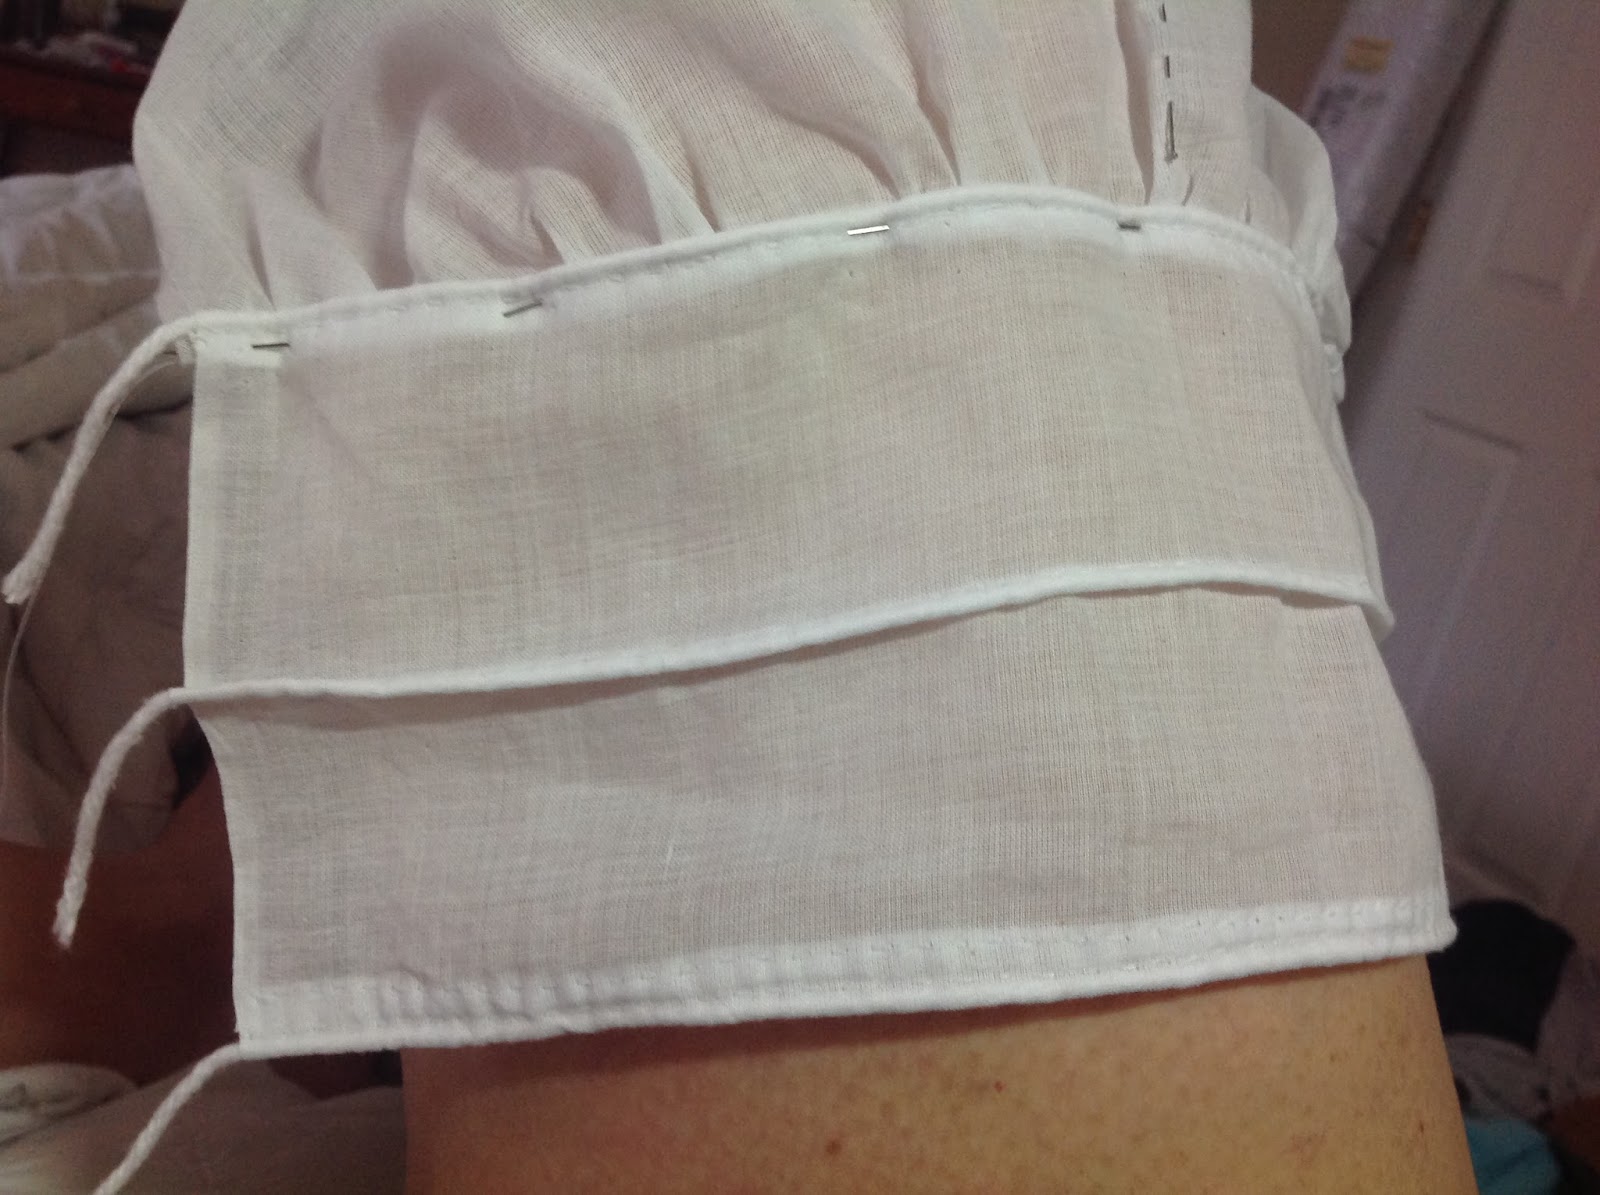
crown and back before gathers
There were no instructions so I was on my own for construction, but it really isn't complicated.  Fussy, but not complicated.  I could have done some research but I WAS running out of time.  My first decision was to gather the back section over a length of cotton yarn, like piping.  This means that it can't be made larger or smaller but I'm OK with that.  I used the same yarn for the piping around the front section.  I chose to box pleat rather than gather the ruffles around the edges because it's easier for me.


'decorative' tuck
finishing edges
The back and crown pieces are single layers, but I chose to make the front piece double layer.  That allowed me to enclose raw edges easily.  I did a fitting before I added the lining piece to the front.  The front seemed to come to low on my forehead so I took a 1 inch tuck across the top.  I'm now calling it a 'decorative feature'.  

tiny strips for bows
Most of the stitching, including the hem of the ruffles, was done in running stitch.  I used back stitch to attach the front to the back and crown, and whip stitched the lining to the front.  


Then I made about 5 feet of 1/8 inch wide 'ribbon' for the decoration.  I had some poly ribbon that would have worked but I wanted to try and do this like it would be done in 1826.  No JoAnns in 1826.  Those skinny strips were really annoying. 1/2 strips of fabric folded like bias tape and sewed with running stitch.

True Facts:
First time I've hand sewed 100% of an item bigger than a handkerchief.
First time I've made something just like the picture (I'm excepting the 'decorative' tuck).
I've never been excited by these little caps but I find that there have been times that I really need one when I get 'dressed up' and don't want to wear a big 'ole bonnet.
I will wear this for Regency, without shame.
I'm thrilled that I will only have to curl the front of my hair.  The rest will be hidden. Or, maybe even fake curls.

And because it was requested that we have a picture of ourselves wearing the item...  (no curls, no makeup, poor lighting, my apologies)


And oh gosh what a month this has been.  Started off great with Costume College.  And then it went downhill fast.  Broken water heater, broken car, broken kitten.  Two of those were expensive, but easy to fix.  One was just kind of awful.  Poor kitty!  He knocked a huge owl house over by repeatedly running into it.  And he cracked his front paw.  He needed to be sedated and restrained for 3 weeks. And during these three weeks I started to clean my sewing room and discovered moths.  A LOT of moths.  They had eaten a knitted hood and were starting on the mitts.  Luckily they had found the fabric but hadn't settled in.   I had planned to try and reproduce my great-grandmother's wedding dress.  I got fabric and lace.  It's gonna have to wait.

Thursday, April 2, 2015

HSF/HSM - stash busting - L

OK.  I did it.  I made the hand-woven thing wider.  I'm still not ecstatic with it, but at least it looks like what it is.  A shawl.  I will it was about two feet longer but I didn't really calculate properly when I started.  And, candidly, since this was some yarn that I got with a knitting machine about 6 years ago, I'm not sure I'd have had enough yarn.  It's only about 6 feet long so it would be perfect for a 4th grader.

I am not a skilled weaver.  I know I need to practice to get better.  I am now realizing my epic hubris in choosing a novice project to show in the interwebs.  C'est la vie.

weaving two pieces at once
I made the shawl wider than the loom allows by weaving two additional strips and crocheting them to the main body.  The join didn't come nearly as 'clever' as I'd hoped (ergo no close-up).

I learned some interesting things.  Use different weight yarns intentionally, and know what the effect will be.  The cream colored yarn was slightly lighter and more stretchy than the blue.  The result was an uneven fabric  It was also very fuzzy.  Weaving fuzzy yarn leads to broken yarn.  Fixing a broken warp is difficult and tedious.  Fuzzy yarn requires a different heddle.  Shoving the heddle into the weave out of frustration isn't a good idea.  Kick something instead.  Weaving two pieces simultaneously was slower than I thought it would be but made matching the white strip a tiny bit easier.  Trying to match plaids WHILE you are making cloth is just a BAD IDEA.

uneven edge at bottom
done!
 I do want to point out that wiggly edges are the mark of a novice weaver.  I managed to make some very wiggly edges.  The crochet did a great job of disguising it.  I tried to take pictures with the tripod but my exposure was utter crap.

Ultimately I folded it and hung it over a door.

Now I need a reason to wear it.  It's actually pretty soft and comfortable.  And not too warm.