
Next up on the VPLL 1912 project is the Spring Mantle.
It's a straight forward build with a lot of fussy work pleating the trim around the edges. I chose it because I think it would make a cute casual jacket for everyday using modern fabric. The challenge for me will be making the pattern fit my body while maintaining the proportions. I did a quick set of measurements from the actual pattern and compared them to my measurements (which don't include wearing ease):
Bust 37.5 Me 47.5
Hip 39.5 Me 43
Back 16.5 Me 16
Upper arm 15 Me 15

So I'm a lot wider than the pattern (no surprise there!) except across the back. I could only estimate the width from the edge of the gusset though and I will want some ease so I'll add there, but only a little. Most of the add will be in the bust and hips. I'll add the bust volume in front but have to spread the hip add around the bottom. I need to do this without making the waist too baggy. And I think the solution will be to add darts under the arm where they won't interfere with the kimono sleeve. The only darts in the pattern are two small darts at bust height in the center front (under the trim). I'll keep those too.
Sleeve length from neck is 23 inches. That takes the sleeve to 4 inches above my wrist bone. I want to add about an inch there but will wait until I have a muslin that fits my torso in case the FBA changes the sleeve length a bit (it shouldn't but, yeah...)
The angle where the sleeve meets the body of the jacket is different in front and back. I'm curious how that will hang. I will make sure and maintain the angles in the muslin.
The body of the jacket is nearly the same length as the sleeve and looks to hit my upper hip. I would like it longer, but will wait until I've done the FBA and hip adjustments to figure out how much. This pattern is just a single piece cut for right and left with a seam in center back and under the arms. There is an underarm gusset for ease. It will be a BIG challenge to modify without turning it into a big baggy mess. I may have to add underbust darts too just to keep some shape.
For fabric, I picked a pewter linen hopsack fabric that promises to ravel like crazy. The lining will be an ivory with embroidered black spots (textural). The trim will be a soft black lightweight cotton. I think it will look good with a slacks or a skirt and still be perfect with jeans.
Part Two - THE FBA and associated modifications
I've done full bust adjustments before, but never actually followed the really cool process that you can find on the internet. And NEVER with a kimono sleeve before. After reading Leila's fantastic post on the subject, I decided I would give it a try. I took a lot of camera pictures to demonstrate my process.
Are you ready?

The original pattern piece. Yes, I already cut it up, but I've shoved it back together neatly.
Per Leila, if the sleeve is removed, a routine FBA can be performed. I held the pattern piece up to my body and determined that the center front was 3 inches from MY center front. So I need to add that to the pattern.
.

Here is the sleeve, cut off. The red arrow is the width of my shoulder (a logical determination of where the sleeve should start). I used the slash line for the gusset as an under arm indicator and just drew an approximate armscye on the paper.
In addition, I've marked my bust point on the pattern.

I cut straight up from the bottom of the pattern to my bust point.
The grainline marked on the pattern was a great guide.
Then I measured about 1/3 up from the underarm (per Leila) and cut from the bust point to that spot. BUT not through. I will need that to stay connected!
Then I separate the pattern by 3 inches at the bust point. (Remember - I needed to add 3 inches!). I know it looks crazy, but breasts have volume. You need to add width and length. This actually will take the bust point out, not the down that it appears.


That's it. Done. All that's left is to put some tissue or paper into the gaping open spaces. Then you have a new pattern piece that should fit you. I am so awesomely confident! I haven't cut my muslin yet!

Next up, re-attaching the sleeves. Urg. Sleeves are my nemesis.

By adding volume with a bust dart, I've curved the armscye too much for a kimono sleeve (IMHO). Next plan (thanks Robin) is to shift the bust dart to a french dart. That should help. Also, instead of worrying about making the sleeve piece fit back in, I'm going to recreate the underarm angles I saw in the original pattern. I can use the lower half of the sleeve piece to preserve the arm trim placement which is cute. I need to make sure I make the sleeve length appropriate for me, and for the look of the pattern.
Out comes the scissors and tape, and its time for dart changes...AGAIN.

I taped in the sleeve and made a muslin. Sleeves were too tight. I cut the pattern from neck to wrist down the shoulder line, and added about an inch. Then I cut another muslin.
Was I tired of it yet? Oh, yes! I always struggle at this point. It's so easy to just saw 'good enough' and start cutting my fabric. But there is no point in making something that doesn't fit, or fits so badly that I'll never wear it (recall that I want to do a modern take on this pattern).
Here is the final muslin, front and back:


I'm pretty happy with this. I'm wearing a tank top AND a light weight cardigan under the muslin to make sure that it will actually function as a jacket (worn over a blouse or other top). For the record, it's very difficult to take a picture of your own back in a mirror with a phone camera. I held it pointing over my shoulder and 'hoped'. Its tough to see, but I also pinned out a bit of the flair at the lower back. I just didn't like it. Next I cut my fabric. I'll post a picture of the final muslin that I'm using for a pattern as a comparison to the original pattern piece.
Here is the final pattern piece laid out to cut, with the original pattern picture next to it.
The red circles highlight the only structural changes I made.

The large circle shows the dart I added as part of my FBA and the small circle shows another tiny dart that took up some volume in the neck area (the muslin just wasn't laying flat). Separately, I added a bit the the center front lower curve in case I want a little more belly coverage. If I don't like it, I can trim it off before I add the trim. Here's what it looks like after I leave the room for a moment. Looks my 4 legged helper had a slide...

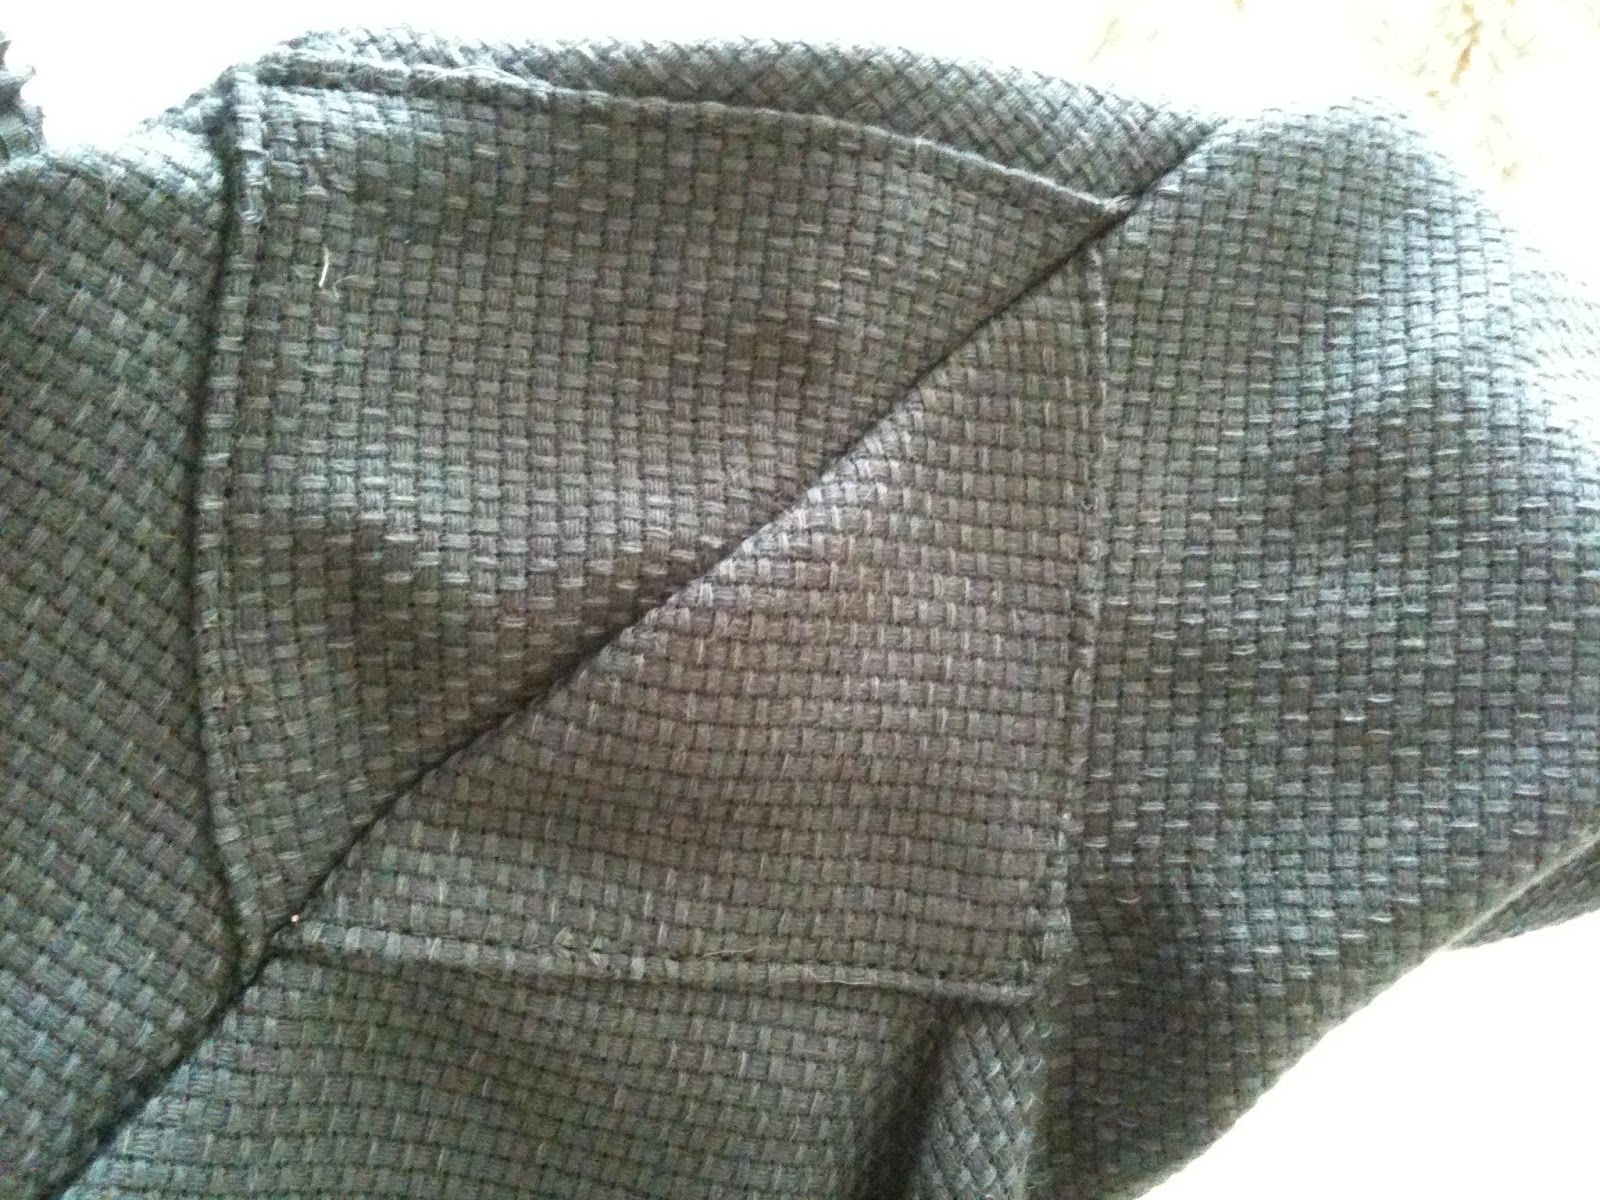
The gussets... I finally read the instructions AND other participants posts. I get it. I was confused because the gusset is CUT as a square. But SEWN as a triangle. I simply slashed the fabric and top-stitched two sides of the square over the slash. Did that on each side of the arm and then sewed right up the middle of the gusset fabric. Trim the extra fabric once you're done! I really think some simple illustrations would help the pattern instructions. Forgive my crooked stitch lines. Those embroidered dots are thick and sometimes would knock me off course. I'm happy this is the lining. See! The shell was more even!


Gorgeous! Well done and THANK YOU for the wonderful explanation!
ReplyDeleteWow- so thorough! Awesomely done. --VR
ReplyDeleteI love the way you describe your alterations technique. Fran Lavolta Press Books of Victorian and Edwardian clothing patterns www.lavoltapress.com
ReplyDeleteThanks Fran! I enjoy your books, and compliments from a writer are very flattering!
Deletethat is so clear - thank you. I am making the mantle soon and also want to wear it. My bust size is 42 and I am 5'10" so may need some length too
ReplyDeleteI'm 5' 10" too (although short waisted). I only needed to add in the front. I really recommend a muslin. It's nearly impossible to figure out the length by holding up the pattern. Once you sew up the arm/side seam everything changes. Actual construction is a breeze.
DeleteHello I really like your blog.
ReplyDeleteThank you.
The instructions and photos are very clear. I plan to request this Mantle pattern and I too will have to enlarge it somewhat in both directions. So thanks for the guidance.
So clear and complete! And thanks for the shout out. I'm kind of an fba nerd. I want to learn how to fba just about anything tricky. :)
ReplyDelete