Showing posts with label Renaissance. Show all posts

Friday, September 20, 2013

Down to the 'to-do's; - Elizabethan - Lisa

For the most part, this is it.
- I need to add rings for the sleeve ties.
- I have aglets for the ties that I have stored in a very special place.  Wish I remembered where.
- I need to pin the for-skirt to my farthingale.
- I need to add a panel in the center front because my bodice gaps a little which is frustrating because it seemed loose when I started.  Being squishy, I have trouble lacing to the same size consistently.
- And I have some decorations for the shoulders left to add.
- I should probably have a head covering.
But I'm basically done.  Hurrah.  Hurrah.  NEXT.

 We are going to the Ren Faire on October 5th.  I've never been.  I'm afraid I will sweat to death. I may have more pictures.  Or not.

Thursday, September 12, 2013

Back to work (Eliza-beef-'n) - Lisa

Sigh.  I'm taking a break from fast, fun things and going back to work on my Elizabethan gear.  I've enjoyed making the underthings but so far I have not been inspired by the actual dress.  Maybe because we started these so long ago, and the project keeps being postponed?  Still, this is something we're doing, so I'm back in the saddle.  We recently cut muslins for our bodices and are ready to cut the fabric.  But before I do that, I need to fix what I've already done.  The neck opening for my chemise was too big and I couldn't keep it on.  None of the blackwork showed when I got dressed.  So I'm making it smaller.  What a pain.  Also, I'm aware that the opening should be big but it is too big for my taste.

First the blackwork facing had to come off and be made smaller.  I cut and sewed it back together less about 2 inches of width and 1 1/2 of length.  It was quite a lot, but I wanted to match the pattern on the embroidery as best I could.  I cut close to the turned edge at each corner so it had to be hand sewn to make sure the rough edges stayed turned under. Then I had to add fabric to the neck of the chemise.  Sounds simple, but it wasn't.  It was like adding the neck facing AGAIN.  I didn't want the addition to show meaning there were few places I could machine sew, so I gave up and sewed it by hand.


WRONG


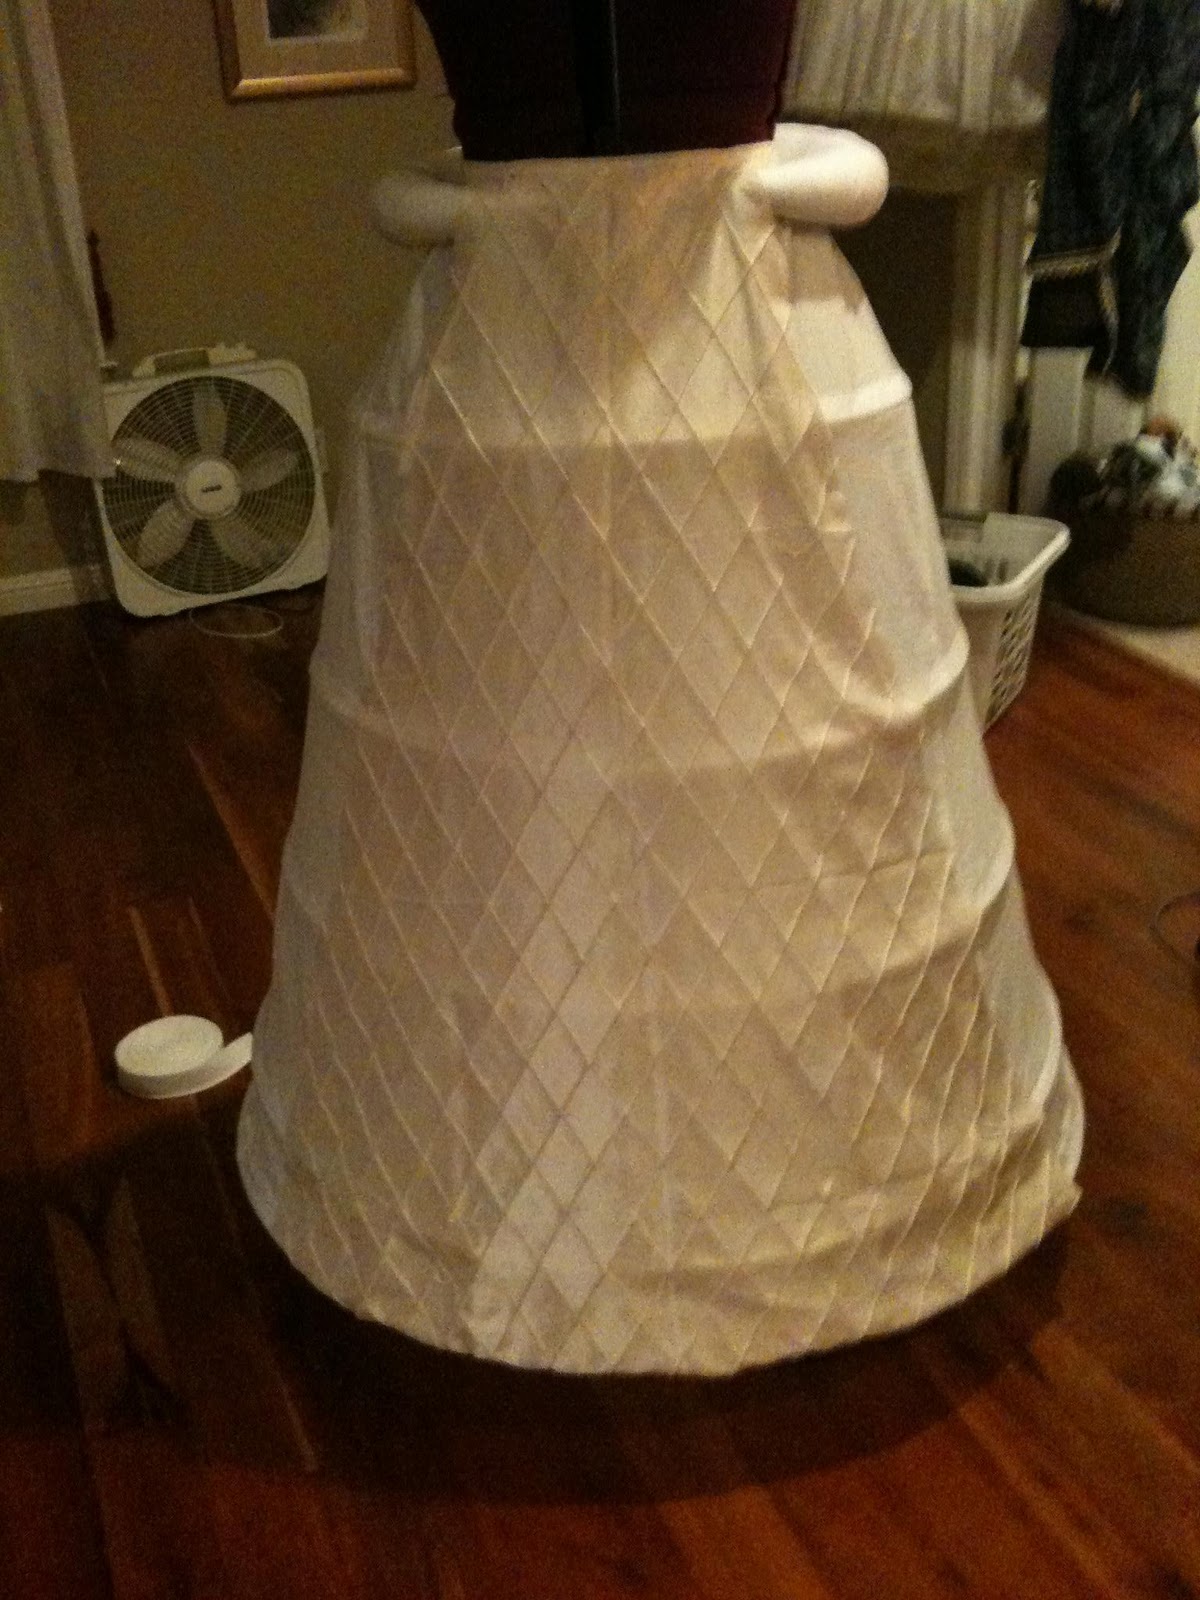
On to the skirt.  I had already sewn the cartridge pleats to the waistband but the front was... off.  So I put EVERYTHING back on and marked the center front and back a few (5) inches where I want the front to be relatively flat.  Then I pulled all that careful stitching and did it over.  By hand.  Grrrr.  But now it's done and I can hem it and put on trim.  (after I shrink the hoops by about an inch each because of course they are not quite right).  When I put skirt on, the weight of the fabric pushed the front of my farthingale out and I ended up on Margo Anderson's Facebook page where I got a lot of helpful suggestions.  I ended up putting the bumroll UNDER the farthingale which redistributed the weight into the proper shape.  The over skirt is now done.

Next up is the fore panel.  Sad to admit that I wish I'd had more hot glue experience before I started it.  Arrgghh.  I had tentatively hemmed it, but that all changed once the overskirt was completely finished.  I finished hot gluing the black 'gems' and decided I needed to tack 'pearls' around them to disguise the hot glue mess.  Anything in ' ' can also be called 'plastic'.  Though once I got the ribbon trim on, I was pretty happy.

Here is a picture of the bottom half of my Elizabethan/Renaissance outfit.  All done.
I may add more to the forepanel, but I'm pretty sure I want a complete bodice first (wink).  I still need to shrink one of the hoops a little.  And the whole thing still seems a bit too big and shiny.  Probably because it IS big and shiny.


Wednesday, June 5, 2013

Sewing Sunday and a Doublet - R and L

Last Sunday was a sewing day.  We wisely decided to target ONE THING for sure with a couple of backups if we had time.  Lisa needs to make a dress for the Gatsby Picnic.

One thing I know, is that I don't want to make a traditional 20's dress.  It just won't be flattering.  I've been looking into early 30's and actually settled on a 1911 dress with modifications. 1911 Dress   I made a muslin of the top of the pattern modified for size and styling.  It fits!  I also had Rob help me choose between 3 fabrics I had targeted for this dress.  I plan to use the middle picture, shorter, and with the collar and cuffs from the picture on the right.  My fabric is lawn, similar in color to the middle dress with ivory trim.


Robin is still immersed in multiple projects. She is plugging away at a renaissance outfit for her bf, and also has a plan for a pirate costume with a very funny alternative vision targeted for the WEHO Halloween street crawl.  She posted earlier as Pirettes of the Caribooban.

Robin:  OK, I HATE that this photo is snapped with me and my hair in "work mode", but that's the way it is. I modified the pattern to hold giant boobs (it's actually one of those Halloween tie-on butts" but worn upside down on my chest. I added 8 inches to the front of the pattern and, instead of making it elastic, I put in a facing and made it a drawstring close. No idea if it works, as I haven't modified the "butt" yet. Still need to finish the sleeve casings and maybe put a little lace on the sleeves, as I am a girly pirate.

With this accomplished, I actually was able to re-trace the pattern for the pants (which the dog had eaten) and cut out the fabric for both mine and my bf's pirate pants. I'm a fancy, girly pirate and he is a dirty shipwrecked deck hand, so I'll have the fun of distressing his outfit and the fun of decking myself out in "finery".


And now for the doublet progress: The wings are interlined with some REALLY stiff stuff so these suckers WILL stick out like... well, like wings.


Here's the skirt decoration. I later found that it will intersect the body, so I have to hand sew on another line of piping to make it match the body of the doublet.

 Here's the sequence of hand sewing on three different sets of trim to make it into one really pretty line of decoration.  Velvet is very shifty and it is a tiny bit wonky in spots, but the overall effect looks straight.


After sewing was done, Lisa actually fixed what she thought was a terminal error in a sock she was knitting.  You can sort of see what's left of the problem in the light grey lattice near my fingers.

After that, she lay about like the lady of leisure she is soon to be, while her cats convinced her it really was the ONLY option.


Friday, June 29, 2012

Renaissance Man's outfit


Image of the pattern cover.

I've been told that "men don't wear OUTFITS" , but what else do you call this?  My patterns are from Margo Anderson's Elizabethan Gentleman's Wardrobe, which you can find here: http://margospatterns.com/Products/ElizWrdrb.html
I gave Roger a choice of pant silhouettes and he actually chose the pumpkin pants, stating that if he was going to wear a costume, he was going all out. Good on him!
The fabric is green velvet.  The doublet will be the one on the right, with a lot more trim but with hanging sleeves for temperature control.  The pumpkin pants will be green velvet backed with orange satin charmeuse and lined with cotton muslin  with orange charmeuse puffy underpants poofing out between the strips. Roger has already chosen his green and orange pheasant feathers combined with a grey ostrich feather for his cap. This year it'll be a flat cap because I'm not sure I'll have time to get heavy duty into millinery.  I already made his shirt, blogged here:http://idlehandsthems-fitsworkshop.blogspot.com/2012/05/i-shall-make-you-cambric-shirt-mens.html

Note:  I'm particularly indebted to this site:http://www.elizabethan-portraits.com/ , a source for much inspiration.

OK, it's now taken me days to unfold each page of the pattern to search for the proper pieces for the men's slops. Margo makes great patterns but there are so many pieces that finding what you need can be time consuming. I've decided that the canvass I have on hand will just have to work for these pants as the thought of yet another trip to Joanne's is killing me.
Last night I finally got down to cutting and actually sewed some seams. Oh, the progress! Before I got there, however, there were ADVENTURES IN DYEING. I stove-top dyed some muslin to use as the pant pane lining but I didn't agitate it enough and it came out blotchy. The next day I threw that and some undyed muslin in the machine, added a huge pot of boiling water to the machine's hot water and ran it through the agitator three times. Still splotchy, but different hues.  That's ok, the material will be used in different parts of the outfit and really won't be seen....much.
I cut out the base in canvass, the inner lining in white muslin, the panes in velvet, interfacing and dark green muslin for lining, and the orange charmeuse for the underlay that shows through the panes.  Next up will be adding the decorative trim.

I cut the lining by tracing from the pattern. Then I cut the interfacing.  The instructions said to trim off excess to 1/8 inch. Well, my seam allowance is 5/8 so i said to myself" Why don't I just cut them less 1/2" on each side and I won't have to trim?"  Nice idea except I forgot I did that, then used the interfacing as the template for the velvet.  That's why my velvet is skinnier.  That's why I will have to either re-cut the velvet or cut another two panes. I think I will just cut two more panes, even though the lining will be a different shade of green I used it all up).  Oh, well....
And today I realized that I basted the center pieces incorrectly.  I was supposed to sew the outside seams together, turn them, THEN baste the remaining raw edges.  I realized that this morning as I was going over how to put it together in my head and realized I'd screwed the pooch messed up yet again. At least I won't have to re-cut.....That is two "Doh!" experiences in a row.


Then THE DOG ATE MY HOMEWORK! Seriously, I came home to a masticated mass of pattern paper. That dang dog had MOVED A CHAIR in order to get up on it and get to the top of the dining room bureau to nab those pattern pieces.  I was too distraught to even look at what was damaged, I just gathered it all up and threw it in a box with a lid to be dealt with later. I'm not a fan of jig-saw puzzles and this will be a big one. Those patterns were expensive, Here are the decorated panes for the slops or pumpkin pants.  The panes go over the canvas base and charmeuse gathered overlay, then the overlay is stuffed with netting. The decoration is a 1 1/2' satin ribbon with gold 3/8" gold braid in the center, 3/16" gold looped braid on each side of the ribbon, and a looped green and gold braid next to the looped braid.  All in all, very fancy!


The pants are basted together and ready for the cannions.

Can I tell you how difficult it is to work with velvet? I'm doing everything I've read about, from using basting spray, hand basting, using a lot of pins, etc. and the velvet still crawls and wiggles all over the place.  I don't have a walking foot for my machine.  I've loosened the tension.  I sew a bit, release the pressure, sew a bit more and yet, I can't get it right.  It's not something you will be able to see unless you inspect closely, but there is not a perfectly straight seam anywhere on this garment.  I'm hoping the trim will distract the eye from the imperfections.  Of course, my boyfriend doesn't notice any of the mistakes and thinks these things are wildly funny. He even asked "Will these pants make my butt look big?" to which I answered with a resounding "Yes!"

Renaisance Dress


Image of the pattern cover.

I'm  changing my mind almost every day about my Ren dress. The more I look, the more I see that, unless it is a doublet, the top and skirt are the same fabric.  I had wanted to do the bodice in the same green velvet that my SO will have for his doublet, but I didn't want the heat of a velvet skirt (and it would break my heart to drag vlevet on the ground). I'd originally thought to have the bodice in green velvet and some thicker trim made of green velvet strips  going down the bodice and along the skirt front edge and the bottom, but the more I think of trying to tie Roger's green velvet in with mine, the more problematic it becomes as I look into working with velvet. It seems that cutting velvet strips and sewing them on will be a nightmare and trying to make velvet piping would probably drive me to drink.  I have enough of the clay silk to do make both a bodice and the skirt, so no worries.   So here's my new idea:  Clay dress, skirt and sleeves - find some interesting lining fabric for Spanish or hanging sleeves if I decide on that or just do the paned sleeve with bigass puff and shoulder boulder strips with puff. (Lisa tells me she's doing the shoulder roll with paned sleeves, so that option is out for me.  We-just-cannot-be-twins rule is in effect. Need to find some sort of satin ribbon to decorate with, maybe rust?  Roger's will remain the same: Green velvet doublet, velvet paned sleeves, velvet paned pumpkin pants with that orange charmeuse showing thru.  The closer I get to actually doing it, the simpler my design will become! I'm so confused.
For the fore panel, here's my inspiration:


http://www.marileecody.com/gloriana/elizabethhardwick.jpg 1590ca. Elizabeth attributed to Nicholas Hilliard (Jesus College of Oxford University)All of that design was embroidered by one of Queenie's good buddies, Bess of Hardwick on the figure on the left.  I have silk drapery fabric for the background and I'm going to use the wrong side of the fabric to boot.  I've download a bunch of Jacobean embroidery designs of birds and flowers (couldn't find any fantastical animals already digitized) and I'll start hooping soon. Just this part should take a long time and a boatload of thread! After it is embroidered, I'll cut it out and back it with canvass. I'm not making an entire skirt, just a forepanel. In the interest of temperature control, I will fore go the underskirt and just velcro the forepanel to the farthingale. Th figure on the right I like because of the pearl detailing. I don't want the huge sleeves on either examples, though. Huge shoulders, yes. Huge sleeve, not so much.

What I like about the black & white outfit  is the interesting use of trim and THE PEARLS!.  I have amassed a selection of pearls with 50% off coupons and I plan to go pearl crazy, as much as I can. I also like the sheer partlet cuz I don't like exposing my chest to the sun, but I also like the big suportasse that some ladies work and I'm not sure how to get them to play well together.  Most of the pics I've seen of costumes show the partlet open, but, historically speaking, on an older woman such as myself, the partlet would be closed. The partlet on the lady in blue is one example I'm thinking of emulating. I will NOT be making a ruff this time.  I also LOVE Bob Mackie's "joke" version.  To the modern eye it looks over-the-top, but if you look at the "bow portrait" of Elizabeth, it's not even close to over-the-top.  I'm glad I finally found a portrait using bows so I can include them on my dress somewhere! I love bows and I haven't seen them used in a lot of the costumes I've researched.  Bows on!

My pattern is from Margo Anderson's Elizabethan Lady's Wardrobe which you can find here: http://margospatterns.com/Products/ElizWrdrb.html  
I've already made the farthingale, blogged here: http://idlehandsthems-fitsworkshop.blogspot.com/2012/04/renaissance-farthingale-robin.html and am almost finished with the corset:
http://idlehandsthems-fitsworkshop.blogspot.com/2012/05/elizabethan-corset-r.html and, of course, that ridiculous bumroll!http://idlehandsthems-fitsworkshop.blogspot.com/2012/02/who-wants-to-wear-inner-tube-around.html

After spending many hours pouring over online fabric choices, I've decided that the sleeves will be lined in the velvet that I already have for Roger's doublet and pants. I also started the machine embroidery for the fore panel.  This is a lot harder than I thought and will be very expensive. I did wait for a 50% off thread sale at Joannes, but these designs will take a lot of thread! I bought my designs at emblibrary.com.  One of the problems I've encountered is that, depending on what printer you use will give you a different result on the colors that print out. I tried to use the Thread Exchange on their site, but trying to actually BUY a specific thread color is ridiculous. I will just make do with what I've already got. Add to that the fact that I can hardly tell which design is which once it makes it from the embroidery card to my machine and that makes for all sorts of problems. I thought I could just start it and let it stitch while I sewed other parts, but I keep having problems.  Last night, right in the middle of a design, I developed massive thread nests and had to stop mid-design and take the machine apart. Sheesh! I've re-hooped, changed needles, changed tension (resulting in a nest of thread, thank you) and all this after stitching a perfect test pattern. Argghhh! This is going to take forever. Here's a pic of what I've done so far:

Monday, March 5, 2012

They mate for life - L

Since my sewing machine is in the shop, I've been working on peripheral stuff.  Things like handwork for the pending renaissance dress, flea furs for both of us, renaissance buttons, and cutting and hemming chiffon. All need to be done by hand.  It's sort of odd to be shifting projects from moment to moment, but I'm getting used to it, and making some progress.  It's become glaringly obvious that Robin and I each have different talents so we are starting to parse some things to the 'expert'.  She is doing all the blackwork embroidery on her machine.  I don't have the ability or the patience to do that.  She is doing hats.  I have some sort of aversion to it.  I am doing renaissance buttons, flea furs, and research on new techniques like hand rolled chiffon hems.  (ugh).  She doesn't have the urge to make papier mache weasel heads...though I can't understand why not...??
Here is a matched pair of headless weasel bodies, including their gilded paws.  More pictures below.

What follows is a string of pictures including my first ever hand rolled hem.  The second edge was smoother.  Clearly this is a learned skill.  We'd heard that chiffon was a bitch to work with.  We heard true.  Ultimately, I found myself singing:
'I Fought Chiffon and Chiffon Won''

This edge is a center front panel.  I had planned to do the bottom hem, but I can't do it until I get it level.  Possibly in the next century?

Also, 4 different renaissance button samples.  Since Robin is doing my blackwork, I said I would make buttons for both her and her beau.  Lucky for me he has chosen one of the easiest to make because it turns out to take a lot longer than I'd anticipated and makes my fingers cramp and he needs 36 buttons!!!   I'm already rethinking my personal choice.

Finally, I tried paper clay for the first time.
Regular clay make the 'heads' for the flea furs too heavy.  
I spread the goop over heavy paper cones and made little 'lumps' with wire toenails for paws.


Then I cut some of Robin's faux fur into creature bits.
I decided to make them have a little character.  Then I had to make little legs.  Once I had sewn on the legs and added a little stuffing to create shaping, I gilded the paw pieces and glued them into the legs.  While I was sewing I was baking the paper clay at very low heat to speed the drying.
The heads will need to be sanded quite a bit and then gilded.  I will glue some fake jewels into the eye sockets and for general decoration.  Here they are!


Monday, January 9, 2012

Learning the hard way - L

I cut the muslin for my new bodice this weekend.  It's mostly a hot mess, but I like the peplum, and the added pleat in the center back.  I'm thinking of using a different fabric for the pleat.  Not sure, just thinking.  The top of the bodice is wrong in many ways.  I expected to have problems.  The pattern is a jacket and designed as outerwear, and bust size is always a problem, especially when I'm in corset.  I successfully managed to add two inches in the bust and raise it about an inch.  I left too much room under the bust seam and need to take in quite a bit.  I didn't realize how much extra room is built into outerwear.  (I even cut a size smaller!)   I'll need to take it in all around the ribs and waist. And smooth the back.  And do something about the gap at the waist.  

Here's the mess. And the best picture I could get of the fabric.  Ah, shiny, reflective polyester!  I'm going to need Robin to help me re-pin all of these seams.  I haven't managed pinning in a mirror yet (though I may try it because I'm impatient).  One I get the bodice to fit, I have to add the sleeves and fit those.  I'm sure they're too big, and the shoulders are gigantic right now.  With everything wrong, I'm still excited. 
I also finished the farthingale, bum-roll, and all of the chemise I can do without embroidery.  I cut out the front panel and the over-skirt panels.  Next I'm cutting out the paned sleeves so I can start embroidering them.  The over-skirt is made from my old navy curtains.  I plan to decorate all the intersecting lines with pearls and faux stones.  The paned sleeve will be burgundy if I have enough fabric (bought a random remnant).  I'm very short waisted and confident I will look quite the divine bovine in this.  Ultimately, the front piece will be lined so the hoops won't show through.


Thursday, January 5, 2012

Bum rush - L

Farthingale is nearly done.  I have to add the very bottom hoop which requires I actually anticipate the hem.  And I'm being lazy about it.  I have to add the waistband.  My post christmas belly is asking me to wait a couple weeks for the bloat to go down.  I made the bumroll.  The Margo Anderson patterns are easy to follow.  Also, it turns out that the inside of a farthingale is a great cat playground.  You can't see it in the picture, but my farthingale has a tail.

Tonight I'm going to cut out the chemise.  I can't sew it yet because Robin is going to machine embroider blackwork on the neckline and sleeves.  I'm actually just drawing those pieces on muslin .

That means she's going to have to fire up the embroidery and make it work.  She claims she needed this kick in her bumroll to get her started.

We have signed up for the 1912 project.  I hope we're up to it.  For the most part we will just be making muslins and we are confident we can do this in a day, if we work hard (sorry, this makes me giggle - there are very limited instructions - we're in way over our heads, but we're still excited)

I've settled on the basic pattern for the bodice to go with my black skirt. It's a modern semi-fitted equestrian style jacket so there will be a lot of modification involved.
This is from the pattern back.  I plan to change the collar, make it very fitted (requiring mods for the girls) and add a pleat at center back for my bustle.  I'm leaning toward the handkerchief hem.  The bustle is black lace with layer of some sort of sheer black gold stuff I got on sale.  This outfit has taken on the title of 'Steampunk Malificent'.  I might have to make a large brass flying inset for a hat.  With horns.  Anyhow, I may start the muslin this weekend.  We're hauling out the Dickens gear to go to a 12th Night Dance on Saturday.  So I may not have as much time as I think.

I was blog-surfing this morning and saw this, which really inspired me.  (Alexander McQueen)


Tuesday, January 3, 2012

New Year - New Project - L

The holiday chaos is not completely cleaned up, but I'm back and I'm starting my Renaissance costume.  I'm still having a tough time getting excited about it, but I think I'll be better when all the underthings are done.

I spent most of the post-Christmas doldrums knitting socks.  Sadly, not very many.  My first effort was stymied by my inability to understand the instructions.  My second effort (using a knitting board for the first time) is almost complete.  I'm about two hours from a completed pair of socks.  They are soft and warm and make my feet look very, very long.  Here's one and a half socks, and the knitting tool:

I also decided to make my farthingale. I got it cut out and realized that I didn't mark all the lines for the hoop channels.  Then I had to try and 'interpolate'.  My pattern is traced, and the original had been cut to accommodate my height. I also forgot to cut all the markings, and only cut some.  Seriously, if you're going to cut the little triangle at all, cut all or none.  Needless to say, there was additional confusion about which sides were to be sewn together.  Ultimately, I got it figured out and sewn.  I was going to do the recommended flat fell seams, but by that time I just wanted to be done.  So the seams are zig-zagged down.  I got most of the channels sewn in....at least until my bobbin ran out and I opted for a glass of wine and bed.  I can finish that this afternoon.  I took advice from a friend, Kyle Bogartman, who sells renaissance outfits and sews for an Austin designer Jennifer Ayers and used plastic pipe with connectors for my hoops.  It's fairly easy to take apart for washing.  Anyhow, after I put in my first channel, I had to put in a hoop to see how it looked.  It looked like a jellyfish.

It really seems too big, but I will be patient and wait until it's done before I change it.