Showing posts with label lace. Show all posts

Friday, February 17, 2012

VPLL 1912 - progress on the Princess Slip

I finally got a couple of uninterrupted hours to start working on the slip.  Since I modified the top front beyond recognition, I had to spend some time figuring out how to put everything together.  And since I wasn't sure how it would fit (I'd held the grocery bag pattern up and hoped), I could sew shoulder or side seams without a fitting.  And it was difficult to decide where to put the front lace without shoulder or side seams.  And round and round.
Finally, I just started.  The beaded lace at the neck is just pinned on since I want to sew it around the neckline all at once.  I got the pintucks made on  one side and will finish tonight.  I think I'm only going to use gathers at the bottom.  Also, I'm starting to suspect that the bottom of the 'top' will not be level.  I'll need to shorten at the side seams and maybe a bit in the center to avoid bagging around the waist.
Next step is to figure out placement of shoulder seams and side seams.  I'm going to do it while wearing it.  Should be interesting.
My plan is to pin the shoulders and side seams and mark where I want the armscye.  If I use bias binding around the arm hole, I don't have to try to figure out 'fit + seam allowance' plus it will look and feel better. I have a clever plan to add a sort of flap at the shoulder and attach lace.  If it works, it will add the illusion of wider shoulders to balance the rest of me.  Pictures soon!  
This is my first ever try at pin tucks and insertion lace.  I also used french seams everywhere there isn't lace.  Haven't done that since the 60's when I was a fetus.

I still need some ribbon for the beading, and some small buttons for the back.  I need to cut the lower front.  And then I need to make about 9 yards of pleated flounce with a lace insertion.  And there goes my long weekend!

I've added a very blurry picture of the back.  Showing off my tiny french seams.  I only had a little 'leakage' in a couple spots.
I also finished the vest and will try and start the frock coat this weekend.  Also, maybe go outside and get some exercise.

Sunday, February 12, 2012

VPLL Princess Slip - From 'It' to 'Me'

This is my very amateur drawing of the changes I've make to the slip pattern to make it a working nightgown that fits me,  Here's what I did, described as briefly as I'm able.  If you don't understand you can leave me a message in comments on this blog.

I loved the proportions in the picture which are NOT the proportions of the pattern.  The flounce is much shorter in proportion in the pattern.  In addition, I'm 5'10" with long legs, narrow shoulders, large bust and thick mid-section.  This forced me to not only up-size the pattern, but make some major alterations.  After printing the pattern, my scale was not correct.  I chose not to fiddle with it since I'm making so many changes already.  The pattern size I show may NOT be the pattern size YOU get when you print.  (For other VPLL participants)

Pattern:
Bust:  37.5
Waist: 28.75
Hip: 44
Est length (from shoulder) at flounce attach:   43
Est total length (from shoulder) to hem:  50

Me:
Bust: 46
Waist: 38
Hip: 45
Est length (from shoulder) to hem: 58

First, the flounce to total-length ratio in the picture is 25%.  I decided 20 to 25% is what I want.  The need for this much flexibility will be obvious later.  I will want my flounce to be between 12 and 14 inched finished.
That leaves me 44 inches for the top of the slip (58 - 14) from the shoulder.  This is very close to the actual pattern.  However my larger bust will require me to add some inches in the front to keep the hem level.  Also, my bust point is notably lower than the picture.  This means I don't want to add width at the widest part of the pattern.  I want to add it where I am widest.  Also, my shoulders are narrow, so I can't just add nine inches.  In fact, I really don't need to add more than an inch or so at the shoulders (across my back is only about 14.5 inches).  I don't want the shoulders falling off.  First step, I held the side front up to myself and made a mark on the pattern at the point that is roughly my bust point.  At the same time, I eyeballed the shoulder height and location of armscye.  I did the same with the center front.  Then I traced the pattern piece from shoulder to natural waist and started to make changes.

Then I ran into trouble.  I have decided to use 2 1/4 inch insertion lace.  With wider lace, it's normal to cut the fabric, hem the edges, and sew on the lace to each side (rather then sewing it down, cutting it and rolling back the hem).  I suspected that the wider lace would give me a little additional length and width.  It would also complicate my calculations.  I started to modify the pattern and realized that no matter what I did, the lace was 'inconveniently' placed.  Very romantic.  Not practical for an over-50, over-weight mom.  So goodbye to the lower bust band of insertion lace.  I moved it to the natural waist,  And if the vertical bands are stopping at the natural waist, why bother with the princess seams up to the bust?  That would require a great deal of fussy modifications when I could that with two panels that go from side seam to center bust insertion band, and from top lace insertion to natural waist lace insertion.  The biggest advantage to this change is that I could measure the distance from the top of my bust (where the lace insertion ends) to the top of my natural waist (second insertion band starts).  And I could measure it over my bust.  That solves the problem of adding 'volume' over the bust.  In addition, the top insertion sort of runs into the bottom of the armscye.  This means I can make it as wide as I want when I put in the lace.  I will need to trim to adjust the armhole but that's what my pal Robin is great for.  I stand still and she marks where the opening should be.  When I drew the pattern (on cut up grocery bags) is marked where the lace would be so I could have an idea of how big the pieces would be with lace attached.  There is no lace in the back, so I merely added a couple inches near the bottom of the arm hole where I am the fullest.  Here's some bad pictures of my grocery bag pattern:


Notes:
The arm-scythe is cut around towards the back, so the side seams are NOT directly under the bottom of the armhole.  Also, by the time the pattern reaches 'hip' length, the front to back proportions are evenly balanced.  Basically, this means I can just add to the pattern evenly from the natural waist down.  

Things I will do 'on the fly':
Cut an extra inch at the top of the shoulders.  I can take a bigger seam if needed.
Cut the armscye as printed.  I can cut away more, but once I cut, it's gone forever.
Cut the front 'bust pieces as rectangles.  I can put gathers under the bust points as needed and take in the side seams too.
Add little 'flaps' on the shoulders to extend them.  This will allow me to 'cheat' the proportions.  These are about 6 inch long curved pieces, 1 1/2 inch at the top of the shoulder, tapering to nothing.
Add a couple inches of length even though I don't think I will need them.
Wait to cut the flounce until the body of the slip is made.  This way I'm sure it's the right length.   After all, I have made dramatic changes, I'm not a pro, and who KNOWS what will actually happen.

Monday, February 6, 2012

Victorian drawers and chemise - R


Today I want to make some Victorian "drawers" and a chemise to go with my Vic outfit from previous posts and I wanted to do it all in one day. That didn't quite work out.
I cut out the pantaloons (Laughing Moon Victorian Underwear patter) for the split crotch design, wondering how this would work in reality, using my measurements to decide on the pattern size.


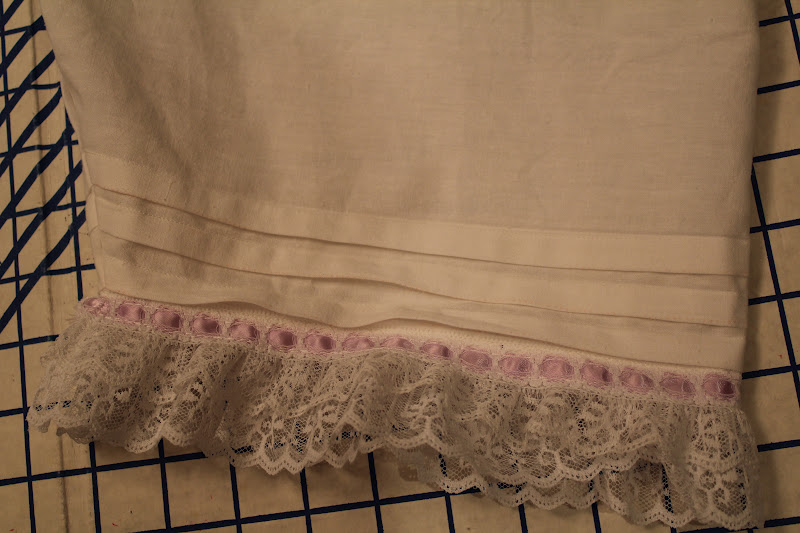
I added 2 inches to the length.  Here are the bottom pleats sewn in. I found it strange that there was not more of a seam allowance/hem allowance allowed, only 1/4 inch. That doesn't leave much room for turning under twice.  Bear in mind that most underwear was french seamed and really finished well, no exposed edges, because they were brutally laundered.
I added a lace trim because they were still too short for me.

Here you can see the two pieces joined at the center front, overlapping.  The pattern said to overlap one inch but that did NOT give me the coverage I needed, so I increased it to a two inch overlap.

The waistband came with no provision for finishing the ends of the tubes.  My advice would be to make the waistband several sizes larger to accomodate an overlap in the back and to allow for turning under (twice) the ends of the waistband tube/casing.  These things barely made in below my knees (that's what happens when you try to measure yourself) and the crotch was too short.  I'm going to make up a new pair knowing what I know now.  Good thing these are made of cheap muslin!

I started the chemise and, irrationally, decided I had to have lace trim, so I dove into my stash that is destined for my Renaissance dress and 'stole' some lace.

I hand basted it in, then put the lining over it and sewed it down.  Unfortunately, I forgot to sew on the side with the hand basting showing through, which would have made an excellent guide. Instead, I ended up sewing it twice as some of the stitching didn't catch the lace.  Live and learn.
I like the trim. Being a novice, I've never actually sewn trim in.  I usually add it after the garment is sewn.


There is no way I can finish this thing all in one day!  I have to stop sewing and get on over to Lisa's house so she can help me dress for the Victorian Ball. Then, tomorrow, I'll already be at her house for our 1912 Project sew-a-thon.  To Be Continued!
The pattern calls for little tucks on the front and back chemise pieces.

Monday, August 1, 2011

Saturday's sound and fury - signifying less than we hoped - Lisa

This ruffled petticoat is 100% done.  It came out really well and I love it, which is good because I'm so sick of hemming and gathering ruffles, I may not ever do another one.  I'll post a proper picture soon.  So tired.....

We didn't take as many pictures as we planned because we were busy.  We started at about 9.30 am. First, Robin pinned two hems for me.  Then she went to work on her crinoline while I stitched gathers.  What started off all sunshine and unicorns, quickly turned to the dark side.  Stitching up the bag required her to balance the hoops on her head while sewing (or, ya know, just ask me for help).  Then she pinned the channels, and re-pinned, and re-pinned yet again.  And then she strapped it on and I re-pinned for length.  It swayed like a drunken sailor every time she breathed.  And then....  well, I'll let her tell you (see prior post).  In the mean time, I was gathering and pinning and sewing ruffles.  Petticoat has a 4.24 yard hem.  Do the math (although most of the ruffles are only in the back).  And then, when the crinoline was still not working out, we looked at the clock and it was 4 pm.  We agreed to stop and eat, and despite reservations, drink a glass of wine.  While we did that we looked over some of the trim ideas I had for my polonaise.  I needed to decide what worked best and if I needed to buy anymore ribbon.  After that we got the crinoline to work.  Even hem, smooth curve on the sides, and every bone in the proper channel. 

Back into my corset, and into the muslin for the polonaise.  Happily, only the darts and the arm hole needed work.  I cut one arm hole and Robin drew the other.  I want to compare it before I cut it to make sure it's roughly the same.  The pattern is really flattering and relatively easy except for fitting.  And in my case, the fitting is very much a personal issue.  My torso can be squished and stretched in some truly amazing ways.  Also, it would have been impossible without Robin.  She did all the pinning and drawing around the arm and then sent me off to the mirror for approval.  I'm going to start cutting this week.

Finally, at 7pm we went over some trim options she was looking at.  Her fabric and trim are lovely.  Despite all the talk about lavender and violet, she will bear no resemblance to Violet Beauregard (yes I went straight to Willy Wonka).  At that point, even the offer of delicious food could not keep me from my car and my hour drive home.  And she promises to post pictures tomorrow!!!

Monday, July 25, 2011

Accessories and Underthings - Lisa

I'm ready for another fitting on my muslin for the Polonaise but I can't do it until next weekend.  In the mean time I must have dreamt up 15 new projects.  But it's time to stop dreaming and start getting things done. I decided to make a petticoat using the 1895 Skirt pattern at Tudor Links 1895 Skirt because I want to use it for an actual skirt and this is a great test.  This pattern is free but not actual size, so I needed to do some math to make sure it would fit me.  It was surprisingly easy to figure out and went together quickly.  I'm using twill tape for a waistband since I have a lot of it and it's fast.  Since this pattern worked well for me, I'm going to go ahead and make a new brown skirt out of a nicer fabric to wear under the Polonaise.

I made ruffles for the bottom but can't attach them until I've got a hem.  There is no word for the special tedium of hemming ruffles.  The ruffles should give me a little more volume at the bottom. 

I also removed the drawstring from a taffeta petticoat I already had.  The new waistband solves the problem I was having with a lopsided hem. 

All that's left is a chemise to wear under my corset.  Underwear? Check!


With a little spare time, I am revisited crocheted lace.  My grandmother showed me how to make doilies when I was just a little nugget, and I haven't done it since, but I was thinking that I could make lace for my sleeves and neckline.  Not because making it myself is so much better, but I can't find anything I like that isn't onerously expensive.  For the record, it is possible to find lovely patterns on line and free.  Unfortunately, trying to read a pattern makes my brain melt.  So I'm making it up myself.  Again.  And trying to remember to write some notes as I go.  First I made fingerless gloves.  I still need to finish hanging strings and add a button closure and probably some decoration. Now I'm just finishing lace for my sleeves.  It's pressed but not starched which will give it more shape.  It ruffles nicely when the edge is straight. I'll make something similar around the neckline.  I may make some for the hem.  I'm not ready to commit to that just yet. 


I now inhabit a world of beige-y sameness.  I am really looking forward to moving ahead with some color.  This Saturday, Robin and I will be helping each other with fittings and hems and comparing ideas for trim.  Theoretically, I will be able to start cutting the plaid after this.