Friday, January 25, 2013

Telling Tails (the Kraken Bustle) - L

I am telling this 'tail' in reverse!  Start at the bottom to watch the evolution of this monster...


The Ass-Kraken is BACK!  After Halloween and other holiday distractions, with a break to make a Haradrim warrior costume, I realized I needed to get back to work on my metal bustle.

Just a quick reminder...  I have no idea how to work in metal.  I'm sort of thinking of it is very stiff fabric.  That can't be sewn.

Here is how I got from 5 tapered metal strips to this:

First I taped them together so I could have some sort of semi-stable form to work with.  There are several types of tape in use.  None of them work well, but medical adhesive tape worked the best.  I know this looks sort of small, but it's about 14 inches long and will be about 12 inches across (I think?) when it's done.

Once it was taped together I could sort of squish it into the final shape and start figuring out how to make the brass bands that will join the segments, and how to finish each end.

Here is the 'head'.  It was fun and exciting except for the part where I don't have enough rivets, and I don't know to curve the brass bands.  Meh.  This is the easy part.  Once this is done I have to make the segment with the eyes that will attach to my body. And all those tentacles...  I'm REALLY at a loss there.  Moving on...
For the 'butt' end (the end away from the tentacles) I made a circle from fairly heavy brass.  Then I bent it in half which hurt my hands.  I used the rivets I had to attach each body segment to the brass end.  They aren't a perfect fit but there will be brass strips covering the joins.

This was so amazing quick to type and yet it took me a really long time to do.

I also cut the inch wide brass bands and creased them vertically.

I can't do much more until I get more rivets.  (ordered and on the way!)


              ____________________________________________________________

I cut metal today.  For a kraken bustle.
I started by making a wire framework to represent the body on the kraken.  

Above the wire you can see the two 4 inch plasma balls I'm using for eyes.  I have NO IDEA how I will attach the eye part and the body.  And no idea how I will attach the tentacles.   (spell check kept trying to make tentacles into testicles - wow) But I will figure it out if it kills me.

After I had a wire shape, I measured it and made paper pieces to represent what I need to cut in metal.

Then I bought some cheap aluminum ducting, glued the paper to the ducting and cut it with tin snips.  


This from waaay back in the fall!

I also worked with my daughter on her striped polonaise.  Here's the bustle and sleeves.  She still has some black trim to add above the ruffles.

And I fit the lining of my tail bodice.  Today I can start sewing the top!

So much to get done and so little time...  OK, so little FREE time.


Tuesday, January 22, 2013

Weapons! - L

 No self-respecting nasty would go out without weapons.  Nor would they walk around with weapons unsheathed.  In an effort to avoid filing and preparing for taxes, I decided to make scabbards.  And, after all, the event is in a mere two weeks...

Isn't it silly to bring a sword and a knife to a dance?  And yet, how can I be a warrior without my tools?  It would be like an elf without ears!  So here they are.  I plan to tie a fragile red sting around them as 'peace-bonded' despite they're not being real.

All of this was made with scraps and remnants and bits set aside for other costumes.  (although I seriously need to quit raiding the renaissance or just finish the darned thing)

I created the shape by outlining the weapon on my scrap of choice. None were large enough for the sword so I added a tilted tip to the scabbard.  Quite evil looking!
 I used a short bit of my renaissance ribbon trim as decoration and sliced the faux leather to weave it in place.  Then I attached it with paper brads.  See the awl for punching holes and the brad...

Then I used Rub n'Buff on additional pieces for the top edge and the tip.  I used a combination of sewing and hot glue to hold it all together.  Then I tacked down a few large gold toned beads for decoration.

Finally I used gold crochet thread to blanket stitch the edge.  I made vertical slices in the back to attach the scabbard to a belt, or, in this case, to the back of my bodice.

Close up:

I also made a flimsy knife scabbard.  It's not as neat looking but it works.  It's just sewn together with a square of ribbon glued on.  I did reinforce the top edge so the knife can go in and out without catching, and added a glued on strap-y thing to attache to my side.

I have all my parts together except a couple of buckles and my turban.  I'll need to try it on to get the proper buckle placement.  So I may just take a quick picture.

The turban (like anything hat-related) has me stumped.

Back soon!


Monday, January 14, 2013

Project weekend

I didn't take a lot of pictures cause... well... I was busy doing a bunch of different things.  First, I had an urge to knit.  My sock was coming along nicely until I realized it was going to be WAAY too big.  So I unraveled and decided to try a very easy shrug sweater pattern using big fat wool instead of the recommended yarn.  It was easy to mod the pattern, but that didn't stop me from screwing it up.  So I switched to a different yarn and it's going well.  But after all that knitting, I realized that I was just avoiding some costuming projects that couldn't really be ignored.

I made a lot of progress on my Haradrim costume.  I finished the bodice, made leggings and the core of the turban.  I got going on my bracers.  I need to glue down the edges on the decorative strips and 'age' them.  I think I will also add some trim to the top and bottom.  I hope to have a picture of it all together soon.

I still need to make a hat for this weekend's Edwardian Ball.
I have an idea.  But my ideas, unlike Robin's, rarely translate into anything wearable.  So we'll see.

Finally I helped my daughter with her Elf dress.  Self-facing piping in satin caused her distress.  So much distress that she didn't notice when she was dipping the dress in her milky tea.  At that point everything stopped so we could wash the dress.  Both tea and milk stain....


Friday, January 11, 2013

The circlet is made!


Eowyn/Arwen dress update for the rest of the story, but here's a shot of the circlet.  Thanks to coupons and sales, I now have tiny nosed pliers and an overabundance of cheap Christmas wire. The silver wire is real and so are the crystals.  On to the belt!

Monday, January 7, 2013

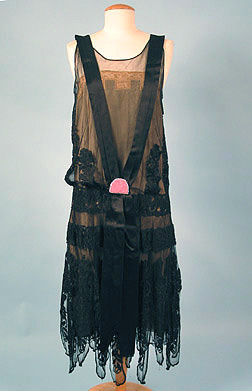
1920's Dress - Rob

Looking for inspiration for a dress silhouette for the 1920s for the 2013 Great Gatsby Picnic put on by the Art Deco Society here in the SF Bay Area.  My SO expressed a strong interest in going next year.  People go all out to make it as authentic to the period as possible. I know I'll end up looking like a tank in this style as I am not flat chested.  I'm actually a rectangle with boobs.  This style will just exacerbate my figure flaws so I'm looking for some visual effect that will minimize this: vertical line, some neck interest, V-ed necks, SOMETHING. The bottom image is from Past patterns, #1965 and is unusual for the time (that appeals to me, right there) but I'm not sure I won't look like a Rose Parade float in it. Not only that, but this is NOT flapper style with the heavily beaded hanging dresses. This is supposed to be daytime clothing at a fancy picnic, so that makes it more difficult as daytime fabrics (for me read: washable) usually don't drape like the ones in these pics. Also, I've been looking at historical pics and the women look frumpy. Hmmm. Not a lot to get excited about for a curvy bod and, no, I'm NOT going to bind my boobs in the summer heat...
Evening dress, 1920’s
Evening dress by Molyneux, ca 1927-29 FranceDress, 1926Dress by Kathleen O’Connor, ca 1925 France, National Gallery of AustraliaTea dress, ca 1925

Coming up - Pirettes of the Caribooban, Arghh! - Rob

Next year, a group of girlfriends want to go to West Hollywood for the Halloween Walk.  Check out weho.org for pics from the past celebrations. But we decided to go as a group.  After much discussion, we decided to go as Pirates.  But not just any pirates - we are all going to buy those false butts
Foam Butt Accessory


and use them as boobs!


 So we will be the Pirettes of the Caribooban.
I don't know what the others will do, but I'm doing the bottom left of this pattern, but with the skirt and vest separate. I'm also making a second pirate outfit without fake boobage, so I'll make two different vests and two different peasant blouses. I also bought enough fabric to make a coat later if I want. I'm also making the vest and skirt reversible. One fabric is red floral jacquard, the other is black broadcloth. The pants will be a red and black stripe.
This year the dollar stores had a lot of pirate paraphenalia around for Halloween, so I picked up a pistol and a sword and a leg knife in a sheeth.  I ordered boot covers, and a parrot. I already have a spyglass (from a steampunk costume) and a sword. All of these will need to be "weathered".  And the poor little parrott?  Well, he'll get a peg leg, an eyepatch, and a little tricorn hat.
I got this nasty wig (It's called "Jailbait" on sale, the cheapest I'd seen it. Good thing, too, because the quality is terrible, but it gives the right look that I want.  Top it with a tri-corn with a lot of ostrich feathers and I'll be good to go.

I still need to find lace for the blouse and figure out how to make a HUGE Full Bust adjustment for the peasant blouse. Or will I even need to do that?  Will the normal peasant blouse cover the fake boobs?  Stay tuned...

Holiday season puttering - L (project update)

I made staggeringly slow progress on my projects over the holidays.  In addition to holiday related business, I kept trying to organize the sewing room and getting distracted by little projects.  The sewing room is still chaos.  And I didn't finish almost anything.  But here's what I DID do:


 Craft foam armor
There are a ton of tutorials on the interwebs.  I won't repeat them.  I used regular paper to make a model.  I used that as a pattern for the craft foam.  I didn't seal the craft foam with glue.  I did heat it to shape it.  The heat seemed to seal it a bit.  Then I spray painted.  The paint makes it brittle.  Then I used Rub n'Buff.  Turns out, you can put Rub n'Buff directly on the foam and it works OK.  Yes, it's more expensive than spray paint, but I am impatient.  Also, I feel like the heat shaping wasn't really necessary since the foam was forced into shape by gluing.  I do think that heat sealing is a good idea but use care since heat can make the foam shrink.


I used hot glue to put the pieces together.  I used Rub n'Buff to make the finish look more like metal (it's wax based so it looks more 'solid').  Then I used scrapbooking brads that look like rivets to decorate.  I looked at ways to use hot glue to add design but I don't have a steady hand or any drawing talent.  Luckily it peels off.  Finally, I used diluted poster paint to age the finish.  Being water-based, it doesn't stick to the armor at all.  I had to rub the surface with a paper towel to get any paint to stick.  Then I had to quickly rub the paint off.  The most impressive part of all of this is that I did it while sitting in bed watching old movies.

It was fun, and I'm glad I tried it (especially the wicked spikes).  Not sure if I'll do it again.  I really want to try REAL metal.
Inside view


Next up, since Robin and I are making LOTR costumes, my daughter decided to pile on.  After all, who doesn't want a princess dress?  She originally wanted to use the ivory Eowyn dress as inspiration, but as I texted her pictures from JoAnn's, she fell in love with this teal satin.  We used Robin's pattern and cut a muslin, fitted it, cut the satin and sewed up the main body all on Christmas day.  We ran out of fabric for the sleeves and she had to buy more.  I am donating a sleeve lining and some trim to this project.  Also, she will make a belt and not use the belly-dance belt for the final costume.

I wanted to hurry and make a crocheted and beaded bag to wear to GBACG tea.  I got 80% done.  I forgot to bring extra crochet thread with me to my family holiday get together so I didn't get it done for tea.  I did finish it though and made a little rose on the flap.  It's really little....  see it?

I just crocheted the plastic pony beads right into the bag as part of the double crochet stitch.


While cleaning the sewing room I found these Christmas place-mats  my grandmother was making before she died.  I decided to finish them.  Actually, it ended up being a little more complicated than that, but it felt like a nice way to honor her.  And they aren't actually finished.  But I made a lot of progress... !!??!


Shortly we'll be posting Projects for the New Year!

There are lots.