Thursday, April 12, 2012

Project Update and Housecleaning - L

While Robin struggles to get back online and get some pictures posted of all the work she's been doing, I'm sharing a phone pic of us at the Titanic dance (where I injured myself dancing).  Rob is wearing a cast and I had taken off my gloves for the evening (too hot!).  In addition, my carefully curled hair had drooped badly.  BUT here are our dresses! We will have better pictures after this weekend when we tour the Palace hotel and have lunch for the Titanic anniversary.

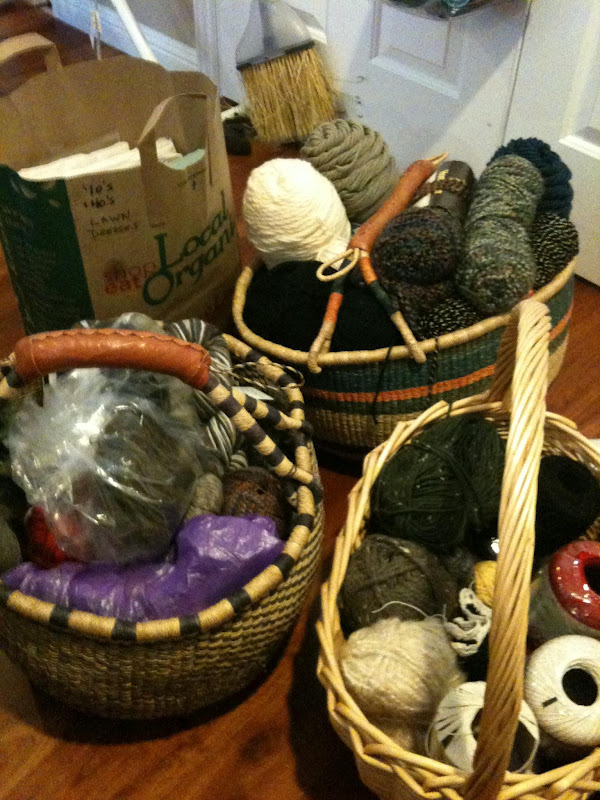
Now that my dress and hat are done, I am taking a few days to clean up my sewing room.  It seems my 'sewing room' has spread like mold to encompass my bedroom and dining room, with outposts in the laundry, kitchen and entryway.  As I'm organizing, I'm trying to prioritize upcoming projects and remember why I bought some of my fabric.  I'm also sorting my yarn because I got a new loom and both a sock knitting book and a sock knitting board for Christmas.  And of course I went out and bought a TON of new yarn.  I took a quick picture of my 3 large yarn baskets (what was I thinking?) And a bag with fabric for two dress that I bought because...well...it was on sale!
Here's what I have on my plate:
Finish the men's frock coat (1/3 done)
Make a renaissance corset.
Finish the rest of the renaissance outfit (need the corset first)
  ('finish the rest' just sounds so easy)
Re-do the muslin for the steampunk Maleficent bodice.
Make the lace bustle for Maleficent.
Make the metal bustle that I no longer need but desperately want.
Shorten the black skirt and petticoat that I recently made.
Make a 1910's day dress (can be used for everyday).
Make a 1940's wrap dress (can be used for everyday).
Make a steampunk military styled jacket.
Make a Dickens day dress.
Whatever the 1912 Project throws at us!
and this is just what I can remember....

I've got 1 grocery bag and 3 bins of fabric plus a box of large remnants.  Oh, and also three 10 yard +  rolls.  And who knows what else I will find while I tidy my space.  I've been doing this for less than a year and it's taken over all my spare time and space.  And I'm not upset about it at all!

Thursday, March 29, 2012

Titanic Tea Dress - bad photos - Lisa


As I mentioned, I'm wearing this dress to the PEERS dance on April 6th.  I'm also leaving on vacation tomorrow and won't be back until the afternoon of the 6th.  I'm getting off the plane and getting dressed for dancing.  I might be too old for these shenanigans.  Time will tell!

I propped the hat on the dress form but this pictures doesn't do it justice.  There are more pictures below, and better pictures in the prior post.

I made net under-sleeves  and still have modest hopes of adding some lace or ribbon the the ends of them.  But I may be out of time.  I also have to do my taxes, laundry and packing....all before tomorrow.


I love the dress but it was a huge time sink. Partly because my sewing machine was broken for two weeks so I did a lot of it by hand.  Then, it turned out that a lot of the finishing had to be done by hand too.

Here's a tour....   The back is not QUITE done.  I need to press/steam it to get pin marks out and the sash isn't totally sewn down. I really like the little chiffon rosette at top of the back (hides the top of the zipper).  The pretty lace layer that hangs down was originally planned to be tucked into the sash but Robin suggested it look better hanging.  And she is right.


Here is the best view of the hat and another view of the net sleeves.

And finally, the whole thing, from the side.

You can see the big feather on the hat (along with my knitting baskets, paper shredder, a hanging petticoat and my son's math homework).

If I don't get anything else done, this will, at least, be wearable. Again, apologies for the dim any blurry pictures.  Took these at 4am with my phone before I left for work.

Sewing day - Crippling progress - L

Sorry for the bad pun....Robin broke her foot.  Badly.  Like, need a cast and isn't weight bearing...
No dancing for her.
Instead, we worked on our titanic dresses.  This was my last chance to get help with fitting since I'm leaving on vacation on Friday and won't be back until THE DAY I'm wearing the dress for the first time.  Ouch.

Robin needed help to make her layers level. This was made all the more difficult by the fact that I had to stand on one leg and "be level!". Not easy.  And we brainstormed about ideas to jazz up her dress which is just not working for her.  (It's a horrid Mother-of-the-Bride Dress gone dreadfully wrong. )It's possible that her fit problem is related to the slant of her shoulders.  She can't change that, and kimono sleeves have no shoulder seams to adjust.

Robin decided to make my hat so I would have it with me.  She really has a talent for this.  Left on my own, I would have ended up with a gull feather Stonehenge surrounded by origami cranes.  Instead, I have a lovely garden tilted at a rakish angle.
Lisa doesn't understand that a gull feather Stonehenge surrounded by origami cranes would be awesome (in a different environment or for a different purpose than we have here). [really?  I can't imagine where, except in my brain where it does, in fact, seem awesome] My talent is taking a crappy looking decorative hat, shaping it so a human could wear it, and decorating the heck out of it so that not much of the ugliness is left to show. I do like my "rakish angle", though. Somewhat inspired, given the exactly round hat shape I started with and the fact that Lisa DOES have a difficult-to-fit head.  Since we cannot have matching hats, mine will just have to be MORE AWESOME than hers! If I get around to it.....

And we did the final fit on my dress, whereupon I sewed up the remaining machine seams, added a period incorrect zipper and pinned the sash.  Now I have to sew the final hem, tack down the lining inside the bodice, tack the sash in place and decorate.  And by that, I mean any additional tucks and tassels along with the sash ends that hang down the back.  And a little something to hide the zipper since the zip totally shows.

I love the way Lisa has mixed her fabrics.  I love her colors and I love the way she's taken off with this simple pattern and made it her own. When we started, we were worried that we'd be too "twinsy", but there's no way that's gonna happen now.

Tuesday, March 20, 2012

Titanic Tea Dress with Lisa Posting for Robin

Robin has been without computer while I've been without sewing machine.  She sent me a couple of phone pics of her progress and I'm posting them for her.  I have pictures of her bodice but they are both poor quality, and show a bit of skin that she might prefer not to share.  So, with that, here is her basted together tea dress in it's poorly lit iPhone glory!
And here is MY hat!  pinned to the hat form, curled, warped and partly decapitated.  The crown was too tall for my cranium.
Now that I've posted this, she can pile on with her comments of woe about fitting this pattern.  Because she really, really doesn't like it.  She is a stickler for fit.  I am delighted by baggy loose stuff.  This is why I need her.  BTW, that's a $3 wall decoration not a 'real' hat.  Robin is working miracles.

I got to a point on this bodice where I just gave up. I cannot make it stop bunching in strange places.  Yes, I know it is kimono-style sleeves and that there should be some pit-ease but this thing bunches above the bust, at your clavicles, any- and every- where it pleases and no amount of futzing is going to fix it.  This is the Whack-A-Mole of bodices whereby, if you fix one thing, another pops up wrong. This is after two muslins, one if which fit fine until I cut it out of fashion fabric.
You can't see it in the photo, but the layers are all wrong, too.  The bodice is just basted to the bottom layers. This thing looks like a Mother-of-the-Bride dress, and a bad one at that.  I'm just hoping that a lovely, creative sash and a killer hat will keep people from looking at this horrid costume for too long. 

I'm loving making Lisa's hat, though.  At least the straw is cooperating. I made that curl with a lint brush and some steam.  Whoo hoo! I'm using the hat block my boyfriend got me for Christmas, taking a perfectly round hat-head hole and making it something a real person could wear. Maybe I should stick to millinery. 

Creeping Progress on Tea Dress - L

OK...this is a really crappy picture and the full length picture keeps disappearing in cyberspace.  But this is where I'm going.  The bodice is sewn together.  Mostly.  The side seams are sewn together.  Everything else is draped and pinned.  I needed to do this because I'm losing momentum.  I can't get any of the layers to hang evenly so I can't sew anything together.
Well, I suppose I could sew in the net sleeves.
Tonight I will try to baste the underlayer to the bodice and then baste each outer layer over it.  THAT should allow me to get close to even.  And when I say 'un-even' I am NOT talking about a quarter or half inch.  I've got 4 - 6 inches of crazy.
Please wish me luck.

This picture is even worse quality, but I finally got it to move from my phone to my computer.  You can see that the top layer is so very far from even that...well... it's really bad.


I mad a TON of progress last night.  I got the top and bottom hand basted together and everything is hanging nicely.  I got the lace 'over' sleeve sewn to the front.  The net 'under' sleeve is sewn in.  Tonight I plan to baste the chiffon and lace over layers into place and baste the center seam line on the top.  There are so many layers and they are each a different size!  I'm basically sewing them into place by hand so I can machine sew them all together.  I even got a hem pinned!  
I can see the light at the end of the tunnel!  And it's TEA!

Monday, March 12, 2012

Titanic Dress - Beading by hand - L

I'm still without my sewing machine so I'm trying to stay busy with hand work.  This weekend I tackled the center front panel for my Titanic Dress.  I was planning to do a lace mash-up but Robin called dibs on it first.  And her center panel is really pretty.  Then I decided I would do some beading.  I wanted to do it in the first place but thought lace would be a whole lot easier.  My thought was 100% correct.  And poor Rob...she was inundated with text messages all weekend.  'How does this look?'  'This way or that way?'  I'm nothing if not a bit insecure in my choices.
This is what I ended up with but my original sketch was a bit different.  I was aiming for a sort of Parisian Metro Art Nouveau  look.  I cribbed the image from some wallpaper prints from the period that I saw online.

I used tiny silver grey glass tubes, dark grey squares and mini ivory pearls.

Hand beading is a pain in the neck, back and fingers.  I drew the pattern on the back of the lining.  I added two pieces of chiffon (to boost the color) and basted the outside edge.  Then I basted the pattern in matching thread to give me something to follow.  Unfortunately I can't draw symmetrically.  So I ended up sewing on beads in the general area that I'd basted.  Afterward I removed basting stitches that showed.
Before I started beading, I added a layer of netting.  I liked the look of the netting over the chiffon (it wasn't structurally necessary).  Also, I hadn't decided HOW I was going to bead the design.  I tried to lay the beads on the design but they kept rolling off.  Pinning was a little better but not much.  Mostly I would bead a little then send it to Robin for approval.  I sometimes can't trust my judgement on stuff like this.  My personal taste is very bare and spartan of decoration so none of this feels natural to me.

First off, the glass tubes didn't all fit over my smallest needle.  Some did.  They were not at all the same length.  This made it difficult to make curves and make the pattern symmetrical.  Also, I might have thrown some of the beads in frustration when six in a row wouldn't go over the needle.  The pearls were easy.  The grey squares were not symmetrical and didn't want to lie flat on one side.  It was bewildering.  I expected that to be the easiest part.  Anyway, I slogged though it, bead by annoying bead.

Here are some of the sample pictures I sent to Robin.  It's done now.  Like many things I'm trying for the first time, I'm glad I did it, and I learned a lot.  Not sure when I'll want to do that much work again.  Also, it didn't take much to make that little center front panel quite heavy.  I hope it hangs nicely.  WHEN I can sew it in, WHEN I have a sewing machine.  Sigh.

Monday, March 5, 2012

They mate for life - L

Since my sewing machine is in the shop, I've been working on peripheral stuff.  Things like handwork for the pending renaissance dress, flea furs for both of us, renaissance buttons, and cutting and hemming chiffon. All need to be done by hand.  It's sort of odd to be shifting projects from moment to moment, but I'm getting used to it, and making some progress.  It's become glaringly obvious that Robin and I each have different talents so we are starting to parse some things to the 'expert'.  She is doing all the blackwork embroidery on her machine.  I don't have the ability or the patience to do that.  She is doing hats.  I have some sort of aversion to it.  I am doing renaissance buttons, flea furs, and research on new techniques like hand rolled chiffon hems.  (ugh).  She doesn't have the urge to make papier mache weasel heads...though I can't understand why not...??
Here is a matched pair of headless weasel bodies, including their gilded paws.  More pictures below.

What follows is a string of pictures including my first ever hand rolled hem.  The second edge was smoother.  Clearly this is a learned skill.  We'd heard that chiffon was a bitch to work with.  We heard true.  Ultimately, I found myself singing:
'I Fought Chiffon and Chiffon Won''

This edge is a center front panel.  I had planned to do the bottom hem, but I can't do it until I get it level.  Possibly in the next century?

Also, 4 different renaissance button samples.  Since Robin is doing my blackwork, I said I would make buttons for both her and her beau.  Lucky for me he has chosen one of the easiest to make because it turns out to take a lot longer than I'd anticipated and makes my fingers cramp and he needs 36 buttons!!!   I'm already rethinking my personal choice.

Finally, I tried paper clay for the first time.
Regular clay make the 'heads' for the flea furs too heavy.  
I spread the goop over heavy paper cones and made little 'lumps' with wire toenails for paws.


Then I cut some of Robin's faux fur into creature bits.
I decided to make them have a little character.  Then I had to make little legs.  Once I had sewn on the legs and added a little stuffing to create shaping, I gilded the paw pieces and glued them into the legs.  While I was sewing I was baking the paper clay at very low heat to speed the drying.
The heads will need to be sanded quite a bit and then gilded.  I will glue some fake jewels into the eye sockets and for general decoration.  Here they are!